
Recently I bought a PC without an OS in order to get a copy of Windows 7 on it (because there’s no way in hell I’m going to let Windows 8 into my abode). That PC was hyped to the gills (here’s my review of the manufacturer), and my RAID setup was using UEFI drivers and GPT-capable drives. In order to use these properly and complete the installation of the OS, I needed to bridge the gap between the newfangled BIOS and the old-fangled DVD drive.
After a few adventurous attempts (all of which refused to show me the fancy-pants drive setups I have established in this case), I got fed up. I finally decided to make a USB key into a Windows installer – and didn’t realize how painless it would be once I did. That thing installed FAST. So here’s my attempt to share the how-to’s with you.
First, you’re going to need a PC. Set it up with RAID as you want it through your BIOS.
You will also need a genuine Windows install DVD (because I’m not going to recommend a pirated one, and I’m not going to answer questions regarding why your pirate copy won’t work right).
You’ll need a compression app installed (I’ve got 7zip, that works fine, there are others but I don’t know if they support the file formats you’ll be digging into).
Lastly you’ll need a USB memory stick with at least 4GB of space on it (my Windows Ultimate install was about 3.1 GB, but if you’re installing something else as well, you might need more).
Using another Windows PC (your old one, or a work one or whatever – note that I used a Win 7 one, I don’t know if the following description’s tools are available on earlier versions), you need to make that USB stick look like a boot drive. Here’s how (you might want to copy these steps into a blank doc and print them out, then check them off as you do them):
- Log into your system with Administrator privileges
- Plug in your USB stick
- If Windows gives you the option to “open folder to view files”, do that. Otherwise open Windows Explorer (not Internet Explorer, I mean the Windows Explorer that shows you all your drives) and select the USB stick you just plugged in
- Open a command-line interface (Start menu > enter “CMD” and press enter – you’ll get a DOS box).
- In the command line interface, enter “diskpart”
- You’ll get a new DOS box with a prompt of “DISKPART>”
- In that DISKPART prompt, enter “list disk”
- You’ll get a listing of all the possible storage media (and some that might not even be there, like if you have a card-reader or something, it’ll show empty sockets as 0-size disks) on the system
- Figure out which one among that list is your USB stick. You probably don’t have many disks as small as the USB stick you just plugged in. Mine was a “16GB” model, it showed up as 14GB in this exercise.
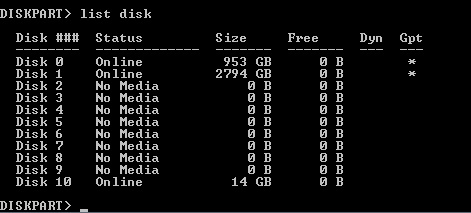 See the pic for an example.
 - Now that you know which disk is the right one (make ABSOLUTELY sure for what you’re about to do), enter “select disk XX” where “XX” is the number shown in the list (#10 in my case).
- Now enter “clean” – this will wipe the drive of any contents it had (which is why you are making absolutely sure you’re on the right disk)
- Now enter “create partition primary” to make a basic partition on it
- Enter “active” to make that partition bootable
- Now enter “format quick fs=FAT32” to guarantee it is readable by even basic drivers
- Enter “assign” to give it a drive letter
- Enter “exit” to quit the DISKPART window and return to the CMD window
- Enter “exit” to quit the CMD window
- Now stick that Windows install DVD in your drive. Exit any autoloaded stuff that might start up.
- Switch over to that Windows Explorer window you had open from before. Select the DVD drive containing the Install DVD.
- Highlight anything in the right-side pane and press CTRL+A to select all the contents of the drive.
- Next press CTRL+C to “copy” the contents
- Now select the empty USB stick from among the drives in the left-hand pane
- Press CTRL+V to “paste” the copied stuff
- (steps 20-23 could be done drag-drop if you are comfortable doing so)
- Congrats, you now have a bootable install USB stick! But you’re not done, as this one doesn’t yet have UEFI / GPT support.
- Now that it’s all copied you’re going to need to rearrange some stuff on it.
- On the USB stick, navigate to the folder “..\efi” (.. means the root of the drive – so if it’s “C:” that means “C:\efi”)
- Inside this folder, create a new folder and name it “boot”
- Now navigate to the folder “..\efi\microsoft\boot”
- Copy everything in there using the CTRL+A then CTRL+C move you did before
- Return to the directory you just created (..\efi\boot) and CTRL+V all that stuff there to copy it there.
- If you’re currently on a Windows 7 machine, grab a copy of “bootmgfw.efi” from the directory “C:\Windows\Boot\EFI” (drive letter might be different if you’re booting from a drive other than C:\), and copy that file into the USB stick’s ..\efi\boot directory.
- If you were able to do this, skip to step 37, otherwise proceed to 32.
- Go to the directory “..\sources” and locate the file “install.wim” – this is an archive containing some drivers you’ll need.
- Open “install.wim” using your compression app (7zip in my case)
- Inside this file, navigate to the directory “1\Windows\boot\efi\”
- Find the file “bootmgfw.efi” in there
- Make a copy of that file (I had to extract one to my desktop to get it out of the archive, 7zip doesn’t support direct CTRL+C inside archives) and drop a copy of it into that “..\efi\boot\” directory you created in step 27.
- Now that it’s in the ..\efi\boot directory, rename “bootmgfw.efi” to “bootx64.efi”
Congrats! You are all set up with a bootable USB stick that has UEFI drivers for Windows to use during install.
Next make sure your BIOS boot options on the new PC includes the potential for “removable media” or “USB” or whatever term it uses for “boot off my damn memory stick.” In the case of my ASUS I think it was removable media.
Turn off the new PC. Plug in your USB stick. Turn the PC on. You should now be booting up into a Windows installation – and when it comes time to pick the drive on which to install, it’ll show all your UEFI drives (like RAID setups) as options! The rest follows pretty standard vanilla installation instructions for Windows, and you can probably handle that yourself.
Point of note – you might want to lock that USB stick into read-only mode and just park it somewhere in case you ever need to re-install (like if one of your drives fails and you have to recover from scratch). Or burn it to a bootable DVD or something like that.
Happy computing!
This all sounds incredibly complicated. I guess I’ll just buy a Mac. It works. Or I’ll install Linux. Same effort as windows, more freedom. *scnr* 🙂
Just checked that again. So it’s really 17 steps to make a windows USB install medium? I feel sorry…
Only the way I wrote it – I’m sure I could have reduced the number of steps, but I wanted to be very clear.
Note also that this is for installing an older OS that had no direct support for the new hardware involved. Making an install disk for stuff it already knows is a much simpler process :).