
Hey hey, everyone!
Today is a day off for a public holiday – couldn’t tell you which one off the top of my head – in Germany. They do a few of these in May and June, and this time around one of them fell on this Thursday. I’ll be back in the office tomorrow, but I wanted to take a few hours to put this together as the real start of my “refresher” with Delphi.
A little personal background – the last version I did any serious work with was in 2009, while working for a company that did an automotive dealership ERP system. They were working with Delphi 7, and had started looking into Visual Studio, but at the time VS was still insisting a lot of repetitive code for data access and it just pissed everyone off.
So – I went on after that and my memory of Delphi at that time was of the “old school” IDE (“IDE” = “Integrated Development Environment”, which just means the app that is designed to host your programming effort and the tools that accompany it – as opposed to picking up a bundle of various unrelated stuff and working haphazardly with it), we still had BDE, and all that. I played around a little with XE3, but not enough to be re-proficient with it. So let’s change that a bit, shall we?
I’m going to approach this as if I was a beginner, who has just signed on with a firm or just bought my own copy and plugged in my license key.
As it happens, I’m currently staying (temporarily living) in a teensy little cave of a one-bedroom apartment, and where I’m sitting right now I don’t have WiFi. As a result, I got a battery of errors when I started up – everything was trying to run scripts on the page, but none of the failures were of a fatal nature. I won’t detail those, because it’s entirely possible those were my own doing from a prior project.
In the “old school”, the first thing you’d get was a form designer, an object inspector, a VCL bar across the top, and probably a project manager. None of these were docked, it was a multi-window app (“MDI” in the terminology of programming, which I guess you’d better get used to – MDI means “multiple-document interface”). This was largely because of Delphi’s origins as a construction site for Windows GUI applications – it later grew into much, much more, but kept to its heritage in how it presented itself with a first impression of “let’s build a Windows app”.
Here, we get a single-window app (an “SDI” – “single document interface”) where all the tools are docked to one another. The most prominent visual that pulls you in is an almost-center section of ‘new’ options for making new projects:

So…as a new user, the first thing I’d like to see is “Getting Started”. Except…I’m in an unusual state of not being connected to the Internet right now, this requires an internet connection to get to, so maybe we’ll come back to that.
I guess we’ll just have to muscle through on our own.
So as a programming system, most tools revolve around a concept of a project, or an app, or some similar goal-oriented thing which will eventually be built and run independently on a computer of some kind. In Delphi’s case, it’s a “Project Group” now (used to be just a “project”, but around Delphi 5 time frame most apps built for business in Delphi had multiple independent components that talked to one another and shared work across platforms in something like n-tier architecture, or via Web Service in Delphi 6, etc.).
Choosing “Create a new Project” from the screen selections here results in a dialog helping you to determine what kind of project you want:
I’ve never been a huge fan of C++ syntax, and since a beginner is going to be our target audience, let’s go with a Delphi app. Highlighting “Delphi Projects” presents a list of various choices in the right-hand pane…

Some of these sound damned cool. An Android service? I’ve got an Android phone…as well as an NVidia Shield on my TV. But that’s a little advanced for right now, so let’s stick with the basics. Console apps are for black-and-white command-line stuff, generally with no UI, and that shit’s for Linux chumps J. We’re programming for a Real OS, Windows. Something people use daily.
Which reminds me – what are we going to build? One of the things that people who want to learn to program generally don’t think about is the answer to that question. “What the hell am I gonna make with this thing?” That was one of my big stumbling blocks too, way back in the ‘90s when I bought my first copy of Borland C++, its fifty 3.5” floppy disks and its forty pounds of books. I played around with that thing, but that’s all it was, I was playing. I didn’t have the foggiest clue what to build then.
So let’s make up our minds. All programming starts simple, let’s pay homage to the classics and do an old-fashioned “hello world”. We’ll look at the parts of the development environment that help us do that, and I’ll highlight some advantages we get in Delphi that don’t really come easy.
The project that fits this description best for my purpose here is a VCL Forms App – as long as we’re going back home, let’s do it old-school style.
VCL means “Visual Component Library” – and it means the framework of pre-built stuff that is in the development system. Frameworks are what drive programming systems. Without a framework, all you’d really have is a compiler and text files, and you’d have to build quite simply everything by yourself.
And that would suck. A lot.
So about five minutes after the first programmers started writing programs that could be stored on something other than a gigantic deck of #$%&ing tarot cards, they started writing frameworks. Frameworks are pre-packaged blocks of code that represent things which get built a lot. For example, take the humble little button on your screen.
Buttons get used all over the place. So do things like text boxes, labels, even the window itself gets used quite a bit. A good framework will have pre-built code that contains these things, so you the programmer don’t have to re-invent the damn wheel just so you can write “hello world” or something.
Delphi in its original state had VCL, and that was it. Borland C++ had OWL (“Object Window Library”), Microsoft had MFC or something for its C++ side, Visual Basic had a bunch of “OCX” controls (I can’t remember if I ever even knew what OCX stood for).
I’m going to take a long tangent here. If you want to dive in with the “hello world”, jump down a ways and skip all this talk about frameworks and libraries and stuff. This info will be useful though, if not now, then later.
About Frameworks…
Originally VCL was one great big fat chunk of code that would get pulled into your app and you’d have a 600k executable that would pop up your window and say “hello world”. At the time, that was pretty freaking huge, despite being really fast. By the time Delphi 2 was released, it was even bigger, and because we had a forest of third-party controls one could buy, every one of those controls would have to be re-compiled into the original VCL code, which promised to become a real spaghetti mess. About two years – and two product versions – after the v1 release, the VCL got split into many smaller interoperating chunks we called “packages”, so your 600k .exe file shrank down to a svelte 80-120k or so, and more importantly all those 3rd-party systems became self-contained bundles that didn’t threaten to corrupt the core VCL.
Another benefit to this was that it kept compile times reasonable. When Delphi crashed the party in 1995, Windows apps were largely C++ stuff – which includes Visual Basic. VB was built in C++, and itself was not a “compiled” app until much later. The C++ compilers at the time, running on PC processors, could take hours to build an app and put it all together. In the case of really big ones, it might be days. Delphi popped up, and all that changed – Delphi could compile an app in seconds. Usually in the single- or low-two-digit seconds. And Delphi’s IDE was written using the Delphi compiler, and all million-odd lines of code in that could compile in minutes. That was a really big deal.
Oh yeah – let’s talk for a sec about what “compiled” means. Compilation at its most basic level means taking one kind of code and converting it into another. Usually that’s in the context of taking something a human wrote and turning it into something that a PC chip and operating system can understand and act on. This is in contrast to “interpreted” or “scripted” code, where something reads the instructions written and simply performs the actions described in them. In a compiled app, the compiler reads your code, and it builds a self-contained output ‘thing’ (in our case here, an executable file), and then it goes back to bed. The output is the actor, and it has within it all the instructions you gave, ready to go. In an interpreted app, an interpreter holds your code in the form of a “script” and acts on it, line-by-line – it’s the interpreter that does all the action. As a result, it is both slower and more limited in its possible actions.
Today, with the current crop of processors, compile times aren’t that big a deal any more. When you can throw six or eight cores with possibly two threads per at a compiler, there’s not a whole lot out there which will take a great deal of time to build. Similarly, most interpreters, despite being a bit clunky, operate like they’ve mainlined about a kilo of coke on a modern processor. They’re still limited in a lot of ways (for example, one comes to mind which doesn’t support using all those cores and threads – it still just fumbles along running one process per CPU), but the big differential between compiled and interpreted isn’t quite the gulf it used to be.
Back to building our app, and the frameworks involved. Today, pretty much everything Microsoft’s environment works with is “.NET”. They have what’s called the “.NET Framework”. Very original. (For quite some time before and well after release, Microsoft had some serious communication problems – most people inside and out simply didn’t understand what ‘.NET’ was supposed to be about.)
Delphi has VCL – and several other frameworks. These all appear as “components” which can be dropped into an app, “wired” together with settings and code, and will be compiled into it when you tell the IDE to build your program. VCL has been, and probably always will be, largely about Windows. The framework makes the creation of windows and controls by calling functions in the Windows operating system which themselves call functions in the hardware of your PC – the disk, memory, chip(s), video card(s), etc.
It also has “RTL” – the Run-Time Library. RTL is a set of non-visual code bundles that encompass common operations not necessarily involved with building visual applications. A good example of an RTL unit is “Math”. There’s a unit actually called math, which is full of functions and procedures that all revolve around mathematical operations like rounding, modulus, sine/cosine, and even things like figuring out payment schedules, net present value, future value, etc. I specifically call this out because one of my earliest self-designed apps used a lot of geometric functions to produce 2-dimensional graphics on demand, and I ended up reinventing a lot of Euclidian geometry in code to accomplish it – I was ignorant of the math unit in the RTL. If I’d known about this thing, I’d have saved myself weeks of coding time. Much of RTL doesn’t hinge on the Windows system, but is independent of this. I mention that, because while Visual Studio is entirely about Windows…
Delphi doesn’t just do Windows any longer.
Delphi also has “FireMonkey” (don’t look at me, I didn’t name the thing), which is aimed at cross-platform programming – which means stuff built on the FM framework can run on Windows, iOS (Apple’s OS for phones and Macs), and Android. There aren’t quite as many components in FM as in VCL, but there are plenty to get the job done. And what you build for one, can then be built for each of the others – so a “hello world” for Windows can also be compiled and delivered to an iPhone and an Android device without changing your code. Of course, if you use platform-exclusive functions (for example, Microsoft SQL Server might be your data repository), you will limit the cross-platform nature of FM to just that platform, so keep that in mind.
Other, smaller frameworks that Delphi makes available include
- EMS “Enterprise Mobility Services”, which links to the ‘mobile enterprise application platform’, which I’m not at all familiar with and smells strangely of CORBA. Basically, if you’re starting up in Delphi and you don’t recognize what this is, avoid it.
- DataSnap, a framework that enables you to divide your application’s working parts among multiple packaged applications/libraries, all of which can then connect to one another and trade data or invoke each others’ functionality, either on the same PC or spread out over a network.
- Web Broker, a set of components that enable your apps to become web server extensions and generate content in the form of HTML or XML documents as responses to being called over HTTP.
- IntraWeb, an app framework that enables you to cook up web apps with a visual interface.
In addition to these frameworks, Delphi also enables you to make calls directly to your platform API (which means making calls directly to the operating system of the computer on which you’re running) either as a straight-through call or by using pass-through calls that are contained in code units supplied with the RTL. (These units don’t quite amount to a library, but they are provided to simplify making the connection to the operating system.)
Back to the application…
So, where were we? Oh yeah, we were going to do “hello world” – and courtesy of all the work that went into building the VCL, it’s going to be dirt-simple to create the window, complete with a button and a pop-up dialog that contains our message. We’ll do it with only one line of code – without the framework, it would be thousands of lines.
From the center pane of the IDE, choose “Create a new project…” and choose “Delphi Projects,” then “VCL Forms Application”; or alternatively you can use the menus File > New > VCL Forms Application…
Whichever route you chose, you land here:
I’m a bit of a stickler here, and despite my old-school start, I noticed over on the side there it says that my target platform is 32-bit Windows.
![]()
Well, to be truthful, I haven’t had a 32-bit CPU or operating system in my house since what, 2006? Maybe 2007? So let’s change that and add Win64 and make it our target. This laptop is on 64-bit Windows, and that fits my goals just fine.
In the Project Manager on the right of the screen, right-click the “Target Platforms” entry and select “add platform” from the menu that appears. You’ll be rewarded with this dialog:
Once you OK this, 64-bit Windows will be added to the targets, and it will be made “active” (it’ll be bold in that list). Active means that when you compile, the executable that gets built will be for the target platform currently bolded. I’m going to remove the 32-bit windows target, just because it clutters up my space and I don’t have anywhere right now where I need a 32-bit app. Right-click on the unneeded one and delete it if you want to do the same.
In times gone by the VCL would be stretched out across the bottom of the menu bar as a set of square icons in a tabbed interface at the top of my IDE. This got a bit unwieldy towards the Delphi 8 time frame (mid 2000s), because a vanilla install would end up with more than a dozen tabs, easily. Since then it has grown to something like fifty categories, and there’s no really good way to present that many options in a GUI interface. The current version packs the VCL controls as well as a bunch of 3rd-party and multi-framework options into a long expandable list called the “Tool Palette,” currently found at the bottom right of the IDE.
What we want is just a button…so how do we find it from among all these things?
Happily, that’s going to be easy. There’s a ‘search’ box at the top of the Palette, just type “button” into that and see what pops up in the list.

TButton is what we want. Either press “enter” or double tap that with a mouse, and Delphi will drop a TButton right in the center of your app window.
It deserves note that the “T” at the beginning of pretty much every component Delphi has ever seen stands for “Type”. It represents a class of object – I’ll give you the broad rundown on “object” and “object orientation” some other time – and the class is what defines the object. Think of a “class” as the same sort of thing as a “blueprint” or “recipe” or “design”. It isn’t the object itself, but instructions of how to make that object. Java totally fucked up in naming both their recipes and their existing elements classes, and that has caused who knows how much confusion for beginners over the years. But that’s Java, and it hasn’t ever made a whole lot of sense outside of “how can we get Windows programmers to build stuff to run on Sun boxes?” Another day for that, my prejudice is showing.
So “TButton” is the class which is used to create buttons. Delphi dropped one on our form. What now?
Now, we configure the button to look and feel the way we want. To do this, we can drag it around the window, we can also grab its sides and corners to resize it. Go ahead and do some of that. I’ll wait.
All done? Okay, when we want to change some of the more nitty-gritty bits about the stuff in our visual designers, we need the Object Inspector. By default this is located in the lower-left corner of the IDE. It shows you the properties and the events of the currently-selected item on the form.
(By the way, “Form” in Delphi terminology represents a “Window” of an app – so when you’re working on a “form” you’re working on what amounts to a window. There’s some extra nuance to this, but for now when you’re starting it’s best to think of it that way.)
Select the button, and look at the Object Inspector. A whole bunch of properties of the button are listed there. “Properties” of a thing in the Delphi world are the qualities of that thing, the settings that make it look and feel and behave the way it does. In the real world, things have properties too – your shirt for example, has properties “material,” “color,” “sleeve length.” These properties for my shirt are “cotton,” “black,” and “short”. The descriptor of the attribute of a property is called its value. Think about the properties of the things around you. How would you describe them to someone?
Back to the button. Its most commonly used property is “Caption” which is the text that appears on the surface of the button shown to the user. By default, the caption of the button is the same as its name. We’re going to change these values now.
Change the property Caption to “Say &Hello”. Notice that as you do, the form shows your change in real-time. Also take note that the “&” didn’t show up – instead, the next character, the “H”, got underlined. This indicates that the H will become a ‘hotkey’ when your app runs, and in addition to pressing it with a mouse click, the button will also respond to the key combination Alt+H.
Find the property “Name” in the Object Inspector. By default components added to a Delphi app will be named as their class plus a number, iterating the numbers based on how many others of that class there are. So we might see “Menu3”, “Button12”, and so on. When you’re writing code, these default names are really hard to cope with, so get in the habit of naming things sensibly – try to keep in mind what they do and what they are, because your code can’t “see” when it is running.
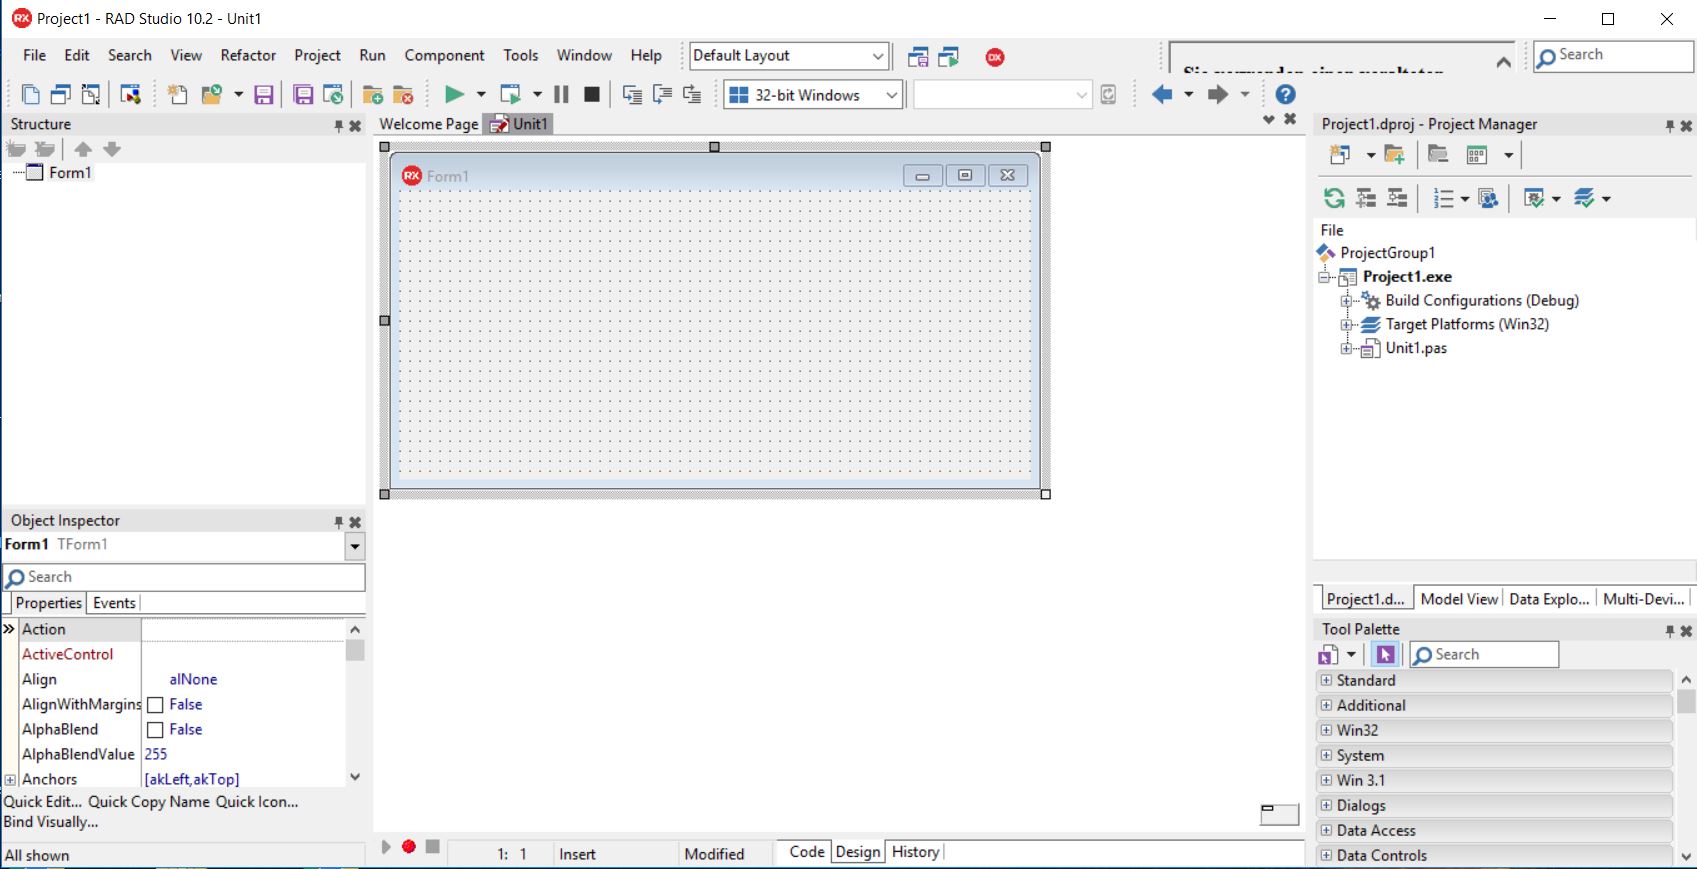
For now, rename this button to “btnHello” – btn being an abbreviation of “button” and Hello telling us what this thing is supposed to do.
Do you see, in the top of the Object Inspector, there are actually two tabs there? Properties and Events? “Events” are things that happen to your objects, like mouse clicks, keyboard presses, and so on. Take a scroll through the available events of a button just to get a feel for what they might be.
Each component will have a default event, and if you double-click on the component in the form you’ll automatically create an event of that type, which will be assigned in the Object Inspector to that event. It basically opens up a little “hole” for your code to appear in, and when that event happens your code will be executed.
![]()
Double click either on the button itself, or in its “OnClick” event in the Object Inspector. Both actions will result in the same outcome, you’ll end up in the code editor, your cursor itching to write a bit of code for a routine entitled “btnHelloClick”.
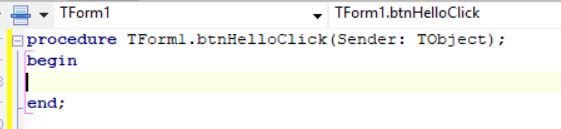
In that line, enter the following code:
Showmessage(‘Hello World’);
Capitalization doesn’t make any difference in the Delphi world, I just use it to make things look a little more sensible. “ShowMessage” is a little routine from the VCL “dialogs” library that will take a single string value (strings are characters) and pop a dialog up with that string in it. Our app is already referencing the dialogs part of the VCL, so we don’t have to add anything to this. Our app is ready to run!
Up in the menu bar, there are two buttons with green right-pointing arrows that can be used to run the app – “run” and “run without debugging”. Either one will work, but as a developer you’re going to want to use “run” most often, because debugging is what developers spend a very great deal of time doing, and your users won’t like it if you never debug your programs. Fortunately, we won’t need any debugging in this app, because it’s very simple and you will get it right the first time.
Press “run” or hit the F9 key (same thing). Delphi will compile your app – you’ll see a dialog indicating its progress – and will run it. You will end up with this:

That’s your app! You just wrote, compiled, and ran your first Windows application! Congratulations!
Go ahead and press the button, see what happens. I’ll be here.
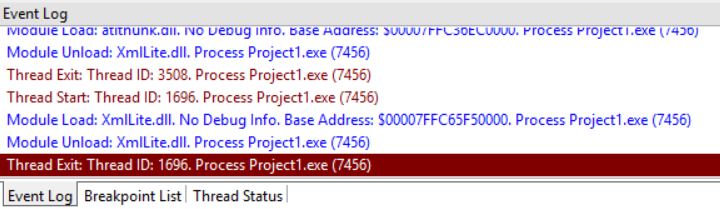
Up pops a centered little dialog saying “Hello World”, right? Pretty cool. Note while you are pressing this, if you used “run” rather than “run without debugging” that at the bottom of the Delphi IDE there is a pane called the Event Log that registered things like “thread exit,” “thread start,” etc. – these are part of the integrated debugger, which we won’t talk about in this article, but is a really super-cool and very useful tool for when you’re writing more complex programs.
Go ahead and close down your app – you can either press the “X” button on the top-right corner or enter the Alt+F4 key combination, both will close the app and return you to the IDE.
Last thing for this article, let’s save this project. It’s not a big deal to lose this, because it’s so simple, but saving it will let you know what files we’re dealing with.
There’s a couple of save buttons on the top of the IDE, one disk for “save” and two disks for “save all” – those are disk icons, by the way. For the younger readers, those look like what we used to use to transfer data and programs around on, called “floppy disks.” Ask your parents what they were.
Either choose the two-disk “save all”, or go to the menus and choose File > Save All.
Your first prompt will be to save “Unit1” – we didn’t rename this unit, because it’s the only one in your project. Later, when there are more units in more complex projects, you’ll want to rename units as soon as you create them, for the same reason you rename components when you drop them on a form. If you have a directory where you want to keep your code projects, navigate there and save Unit1 in the directory where you want to keep your Hello World project. Note that if you don’t keep your projects separate, you’re likely to overwrite files and lose your work, so definitely use different directories for each project. Get in that habit now.
After being prompted for Unit1, you’ll be prompted to save “Project1” as well. Project1 is the name of the program you’ve just written, and Delphi will name its executable the same as your project file name. So if you want to call this something else, now’s a good time to change its name. “HelloWorld” would be a good, if not very original, title J. (Delphi doesn’t like spaces in project names, by the way, that’s why there isn’t one in my suggestion.)

We’ll talk about what all those files are another time. What’s important is that now when you compile your app (go ahead and do so now that you’ve saved the project – Ctrl+F9 will compile it, or you can go through the menus and choose Project > Compile HelloWorld), the executable will be found in this directory, in a “Win64” subdirectory.

We’ll deal with these…later
You can take that executable and run it on any 64-bit Windows computer you want now, it’s all yours and you get to do with it whatever you want.

That’s the one that matters.
So you’re done – you’ve built your first app in Delphi and you’re ready to tackle the world! Congratulations again.
I think the next one of these I do, we’ll do a little bit with some data, and tap into a Microsoft SQL Server. But for now, I’m going to go have a beer and build a model or something. I’ll raise a glass for you, and hopefully I’ll see you next time!