
Sooo…my Cisco Meraki subscription runs out next month, and Cisco doesn’t want to talk to me about what their re-licensing options are. I like my MX64, the interface is really nice, and the device is super effective. But I can’t find out what they want to charge me for a fresh license, or even if they will sell me one. Their partners wouldn’t respond, they themselves wouldn’t respond, so I took the logical next step.
And I upgraded to a Fortinet firewall. I wanted a NGFW with full-service features, Fortinet’s got it. I wanted one that had a great rep, they got it. I wanted a good, clean UI, and they got it. Well, mostly they got it. I’ll say this – Meraki’s UI has Fortinet beat on intuitive nature, clean look, and logical division of features. It’s just better. But Meraki’s UI has a flaw: it is entirely cloud based. If I have a problem with my firewall, chances are high that I can’t reach the internet. And that means I have no method to work with my firewall unless I happen to have all the CLI memorized and the Meraki unit decides to be kind to me while trying to authenticate my login with Putty.
So I got myself a little Fortinet, a model 40F. Much like the Cisco offering, Fortinet uses the same web interface and commands across the board of their product line, so if you learn one you can run them all. Nice touch, that.

And much like the difference between the UIs, the setup had a similar situation. Fortinet just required a bit of a push over the finish line, and it was a frustrating push. With the Meraki, it was quite literally a plug-it-in-register-go affair. You could add more complicated configs after setup, but if all you needed was an above-average firewall that would let you go after setup, that was the bomb. I had it in and running in ten minutes.
Next-Gen v. Traditional Firewalls

You keep hearing about “NGFW” devices in network circles, but what exactly are they?

Briefly, traditional firewalls worked on a port-and-IP basis, blocking undesirable connections by simply turning away traffic that wasn’t addressed acceptably.  Maybe it came from the wrong country, or asked for a port that wasn’t “open”.  This is called “intrusion prevention.”

NGFW devices do that too, but additionally they can inspect the contents of the packets that are accepted, and are able to filter traffic that contains unacceptable content.  For example, a NGFW might know to look for viruses or dangerous payloads in email traffic.

As well, the NGFW is usually enabled with frequent updates to its library of dangers, or it may even perform cloud-based real-time inspection to catch zero-day threats.  A Fritz!Box just doesn’t do that.
Not so much the Fortinet.
Which is why I’m writing this: I want you to be able to do a fast setup and avoid the stress I had.
So let’s go through it, shall we?
When you get your new device, you pop open the box and the first thing you see is a “quick start” manual, which will do you no good at all. I’ll explain why shortly.
Beneath that, you’ll get a net cable, a power adapter (standard wall-wort with various national plug adapters), and of course the device itself sealed up in a plastic bag. As well, a little sticky that has some simple steps on it.
Position yourself within arms’ reach of your internet modem/router, and lay your things out around you in easy reach. Have a laptop or other computer powered up and ready here. Minimally you’re going to need the Fortigate device, its power adapter, two patch cables (LAN cables), and your computer.
Important: Don’t Get Ahead Of Yourself. I had this device up in my office, getting it revved up to take over from the Meraki, and I was setting port forwards and a bunch of other stuff prior to the following steps. That was a mistake that cost me a few serious head-scratches. Some of that stuff conflicted with the basic setup and cost me time.

1. Follow the instructions on the sticky, but not in the order given.
Do the “Cloud Setup” first. Go register your name and enter the “cloud key” like it says.
Next, assemble the power plug and plug the little critter in. Attach your laptop or other computer to the device using the included cable. Turn off WiFi if it’s on, and either enable DHCP (in which case you then need to tell your adapter to renew its IP) or set it to IP 192.168.1.1 with a subnet mask of 255.255.255.0.
If you have a mac or an iPhone, do that Apple stuff. Whatever.
Open a browser and go to HTTPS://192.168.1.99. < Note the “S” there. Gotta have that. The device by default won’t feed you a page if you’re not on HTTPS. You should at this point be given a web page interface to the device. By the way, the login is “admin” with no password. It’ll prompt you to change that when you enter.

Should look a little like this (I pulled my ISP’s IP and the license server’s IP just to avoid confusion – your IPs will be different)
By the way, go look for my article on passwords. You want to set a good one for your firewall. And keep it safe in a manner that you won’t forget it.
It will also prompt you to register your device. Ironically, you won’t be able to, so just tell it “later”.
If it does not give this to you for some reason, get your vendor on a chat line or a phone line and have them walk you through enabling the web GUI (details can be found here: https://kb.fortinet.com/kb/documentLink.do?externalID=FD34688). I didn’t have this problem, so I don’t anticipate it to be common on new devices.
All good so far? I hope so.
2. Plug the Fortigate in to your modem/router.
I have a “Fritz!Box” 7490 here (yeah, I run multiple firewalls in a chain, call me paranoid if you have to), but this will work from a regular modem or other router, too. The physical structure of your network when you do the setup should break down into the following:
Wall Socket > modem/router > Fortigate device
Where “>” represents a physical cable (it might also be wireless, but I’m not getting into that here). So the wall cable goes into the “WAN” or “Internet” port (or whatever similar word they’re using on the brand you have). You’d normally then have 2-4 “LAN” ports beside that which are supposed to lead to your computer or a switch or something.
Take the second of your patch cables and plug it into the “WAN” port of the Fortigate (the first is running from the Fortigate’s LAN port to your PC), and the other end of it should go in one of those LAN ports on your modem/router.
Wait a few seconds, and then in the UI page of the Fortigate, navigate the left-side menu to Network > Interfaces. You should see at the top of this page a little indicator showing which ports are active on the device.

You can hover over the ports, by the way, and they’ll give you a read of the connection details. Nice touch there, Fortinet, I appreciate that attention to detail.

This would be a good time to go into your modem/router and fix the IP it gives your Fortigate, just so you have a record of it somewhere.
3. You’re all done! Happy surfing. No, just kidding, this is just where they dump you on the side of the road.
No, really. This is where they leave you. On my old Meraki, that’d be fine, because I could get out to the internet from here and start goofing around and playing World of Warships or reading stupid Facebook posts. But really, you’re not done here. If you try to get out to the internet (go ahead, I’ll wait) you’ll find that your browser just gives you the finger. Usually in the form of “DNS can’t be resolved” or something equally useful. Also, in the Fortigate dashboard you’ll see under “Licenses” that none of them are confirmed and there’s a red bar that says “Unable to connect to Fortinet servers” or something like that.
@Fortinet – here’s where you guys dropped the ball. A couple of simple defaults would have saved me (and who knows how many other people) a few hours of grief and head-scratching.
Are you still at the “Network > Interfaces” page? If not, go back there. You have to configure something. In my case (with a model 40F) there aren’t too many interfaces to choose from, and mine is called the “Physical Interface”. Yours probably shows up as “wan” or something similar.

Double-click on its name or right-click and choose “edit”.
Here’s what you get taken to next – most of it won’t need to be modified, you just need to review it and be passingly familiar with what’s in here:

The items highlighted in red there are ones you need to pay attention to.
- Alias – give your WAN connection a meaningful name. Even if you only have one WAN hookup, it doesn’t hurt to name it after your router or your ISP so you know what you’re looking at.
- Leave role as “wan”. If you’re using others, then you probably know enough that this article isn’t telling you anything new.
- Depening on how your modem/router hands out IPs to equipment, pick the appropriate style here. My Fritz!Box is set up to use DHCP, and I’ve told it to always give the Fortigate the same IP when it sees it, so that’s the route I took here. If you prefer to fix the IP within the device itself, then you’ll want to set it up on Manual.
- DNS – confirm that your DNS server is set correctly. If you don’t know what I’m talking about, ignore this for now. I prefer to use Google’s DNS servers for my stuff, so the Fritz! Hands that off when an IP is requested. Your mileage may vary.
- Default gateway – for the Fortigate, its default gateway out to the internet will be your modem/router. Ensure that this value represents the IP that your modem/router presents inside your walls (not the value it uses on the world-facing side).
Record your default gateway value in notepad or something. You’ll need it shortly.
4. Here’s The Biggie
We’re at the point where the biggest “missing link” should have been.
@Fortigate – again, a short add here will save your customers some grief.
Devices like a regular modem/router or regular commercial firewall products that you can buy at MediaMarkt or Best Buy, etc., have a default rule in them: “If I get traffic coming in on the LAN ports, and the address isn’t in my house, squirt it out to the internet to find its way.”
That rule doesn’t exist here on the Fortigate. Which is why if you try to reach a Google server right now, your system will tell you to go spin. So, we have to create it and give it to the Fortigate, so it knows that it should do its job.
Navigate on the left-hand menu to “Network > Static Routes”. There’ll be a big bag of nothing there. At the top, choose “Create New”, and you’ll get this:

Leave “Destination” alone. That represents the address of the packets the firewall receives. Grab that “Interface” drop-down and choose the Wan interface you configured (you did give it a good name, right?) a few moments ago. It should populate the Gateway Address for you automatically, but if it doesn’t, you can enter it because you recorded it in Notepad or something when I told you to. 😊
When you’re done, it should look like this:

In computer-speak, we’re creating a default static route that’ll go into the route table of the device. In human language, that means “When the firewall sees an address on a packet it doesn’t recognize, it throws it out the window into the Internet to get handled.”
@Fortigate – Really folks, you should just include this as a default. Experienced users can always delete or disable it. How many people buy a firewall and then don’t have a default like this?
Don’t worry about Advanced Options or anything, just make sure to “OK” it.
At this stage, I re-booted my firewall (just pull the power and put it back in) to get it to take up the new route. I suspect if you go get a coffee or something instead it will eventually pick up the rule and apply it without this, but I didn’t want to wait.
Now that the static route is in, you should be able to connect to the internet from your firewall. At the top right of the page, you’ll see an option for a command-line interface:

Click on that, and in the faux terminal that pops up, enter:
execute ping 8.8.8.8
You should be getting back something that looks like this:
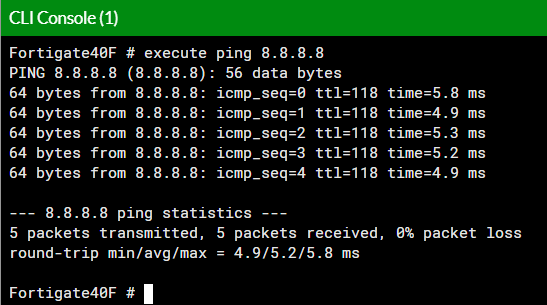
You can also now connect out from your computer connected to the firewall.
The dashboard of the Fortigate should now also show under “Licenses” which ones are active, and that red “unable to connect” bar should be gone.
By the way – you can now safely set up your port-forwarding rules. If you’d done so before this, your default way out into the internet would have conflicted with rules already governing the default gateway, and you’d be wondering why the Fortigate won’t accept your default route outwards.
That sucked, for about a half an hour.
5. You’re in the Home Stretch now
So, you bought a firewall, and you’re all set to connect to the internet. But this isn’t just some plain old Fritz!Box, this is a Next-Generation Firewall that can protect you in all manner of ways that you should expect out of a 21st Century product.
But as with the “tell it to send my traffic to the internet” case, we have to actively tell the firewall to use those abilities.
@Fortigate – really? You ship all these cool features and you ship with them disabled? The FW can’t ask “what am I licensed to turn on” and then turn that stuff on in a policy for the user? At least provide some basic enabled stuff, folks.
Let’s turn on the goods you paid for.
This is the stuff you pay annually for, the really solid protection measures. You might have bought your device without any subscription, in which case you can skip this step, but I suspect you wouldn’t shell out that kind of bank just for an intrusion-protection brick.
In the left-hand menu, head for “Policy & Objects > IPv4 Policy”. There will be one or more rules already present in that bucket. What you want is the one that is titled “internal > [your WAN name here]”. Open that one up and edit it.
You’ll get a screen something like this:

First, give it a name. I use “Default Permitted” because this policy will by default permit someone to issue requests out to the Internet, and will only interfere if the target has some issue. Hence, by default it permits the traffic.
Incoming interface refers to where the firewall is seeing the traffic originate. In this case, it will come from my internal network. Outgoing is where the traffic wants to go – in this instance, out the WAN into the wild, wild internet.
Source/Destination should be “all” in this case. I’m defaulting to allow almost anything, after all.
Schedule – how or when is this rule going to run? You can create rules that apply only during office hours, or ones that turn off when the kids are at school, etc.
Service – this refers to what protocols are covered (HTTP, mail, pings, yadda yadda). Kind of a poor choice of name for a pack of protocols.
Action – in my case here, “accept”. If I wanted to shut everything down by default then I’d use deny. If, for example, I was operating a high-security bank or defense contractor, I’d probably start with “deny” and add exceptions for accept. But, this is my home network, and I want my Netflix, so Accept it is.
The Firewall/Network options should be left alone. If you’re comfortable enough to dork around with those, you don’t need to be listening to me ramble on.
Now, here’s what you paid for: “Security Profiles”. By default, these things are turned off. Turn them all on. Your device will eventually complain to you if you don’t have a license to run a particular profile, and you can turn it off then. This section should have been called services, because really that’s what they are – paid services that add value beyond just the hardware and the Fortinet SOC chip.
Take note of the “Web Filter” – you’re probably going to want to go in and adjust a few things there, as this is what governs the content filter for your network. For example, I occasionally play on pokerstars, but gambling sites are by default blocked. So I wanted to loosen that rule a bit. I also wanted to block certain types of site from my net which my kid doesn’t need to see, so reviewing those settings was pretty important.
Once you’ve enabled what needs to be on, make sure “Enable this policy” is green and “OK” this to apply it. The line entry should now look a little bit like this:

6. You’re All Done! Seriously, this time. Time to wrap up.
So, from the perspective of a home or small business, you should now be good to go. If you are going to implement a security fabric, that’s really beyond the scope of this little how-to (and if you’re familiar with that angle of Fortinet’s stuff, you probably didn’t need this guide anyway).
Anyway, I hope this helped to walk quickly through the setup of your new Fortigate, without all the hair loss and whiskey drinking that my own setup ended up putting me through. If it did help you, let me know in the comments. Makes me feel good to know that I helped at least one person avoid the trouble.
Happy (safe) computing 😊.
This all seems like a lot of trouble…
Yeah, admittedly it is a bit of a pain in the ass. But I have to say, as an IT person reading the news, the cost of a NGFW is pretty worthwhile. In the case of Fortinet, you pay about six to eight hundred euros for the device itself and a one-year subscription to the security services. It’ll be a two or three hundred per year after that. Other vendors of similar quality cost about the same. That’s not cheap.
But then, losing my entire ripped video or music collection would represent a few hundred hours of work that would have to be re-done. Worse still, losing the first eight years of digital photos of my kid would really chap my ass too. And I haven’t even touched on the potential for identity theft or potential monetary loss if my digital bank statements got stolen. Or if my network somehow became compromised and my work laptop got exposed. I think it’s safe to say that anyone who runs their business on computers needs the kind of protection a NGFW offers.
None of these problems is a certainty, and none of them is even a probability. I know my stuff, and I’m not likely to have a fault in my own behavior. Likely being the key word. I can still make mistakes. Hell, even Jason Momoa has a squad of bodyguards. Jason freaking Momoa.
I’ve got a family now. My kid has figured out how to download stuff to her tablet (thanks, Google, for the Family Link – I know exactly what she’s getting into now). My mother doesn’t necessarily have the same paranoid instincts I do about mail attachments. My wife is pretty darn sharp, but she can make an error just as I can. Who knows what some cretin in a professional hack-farm is designing right now to screw everyone over with?
I know I won’t necessarily be prepared to deal with it. So, I outsource it to the best minds in the business. They will see the news about that guy before I ever do, and will be working on a fix before I’m done with my coffee that morning. They’ll jet it into my device while I’m still getting dressed.
I like that.