E-25 Build Log – Part 5 (final)

Well, unfortunately I lost all the pics of the finished photo-etch, and that kinda put me off of tracking the remainder, so my apologies for those who were wanting to follow that section – sorry :(.

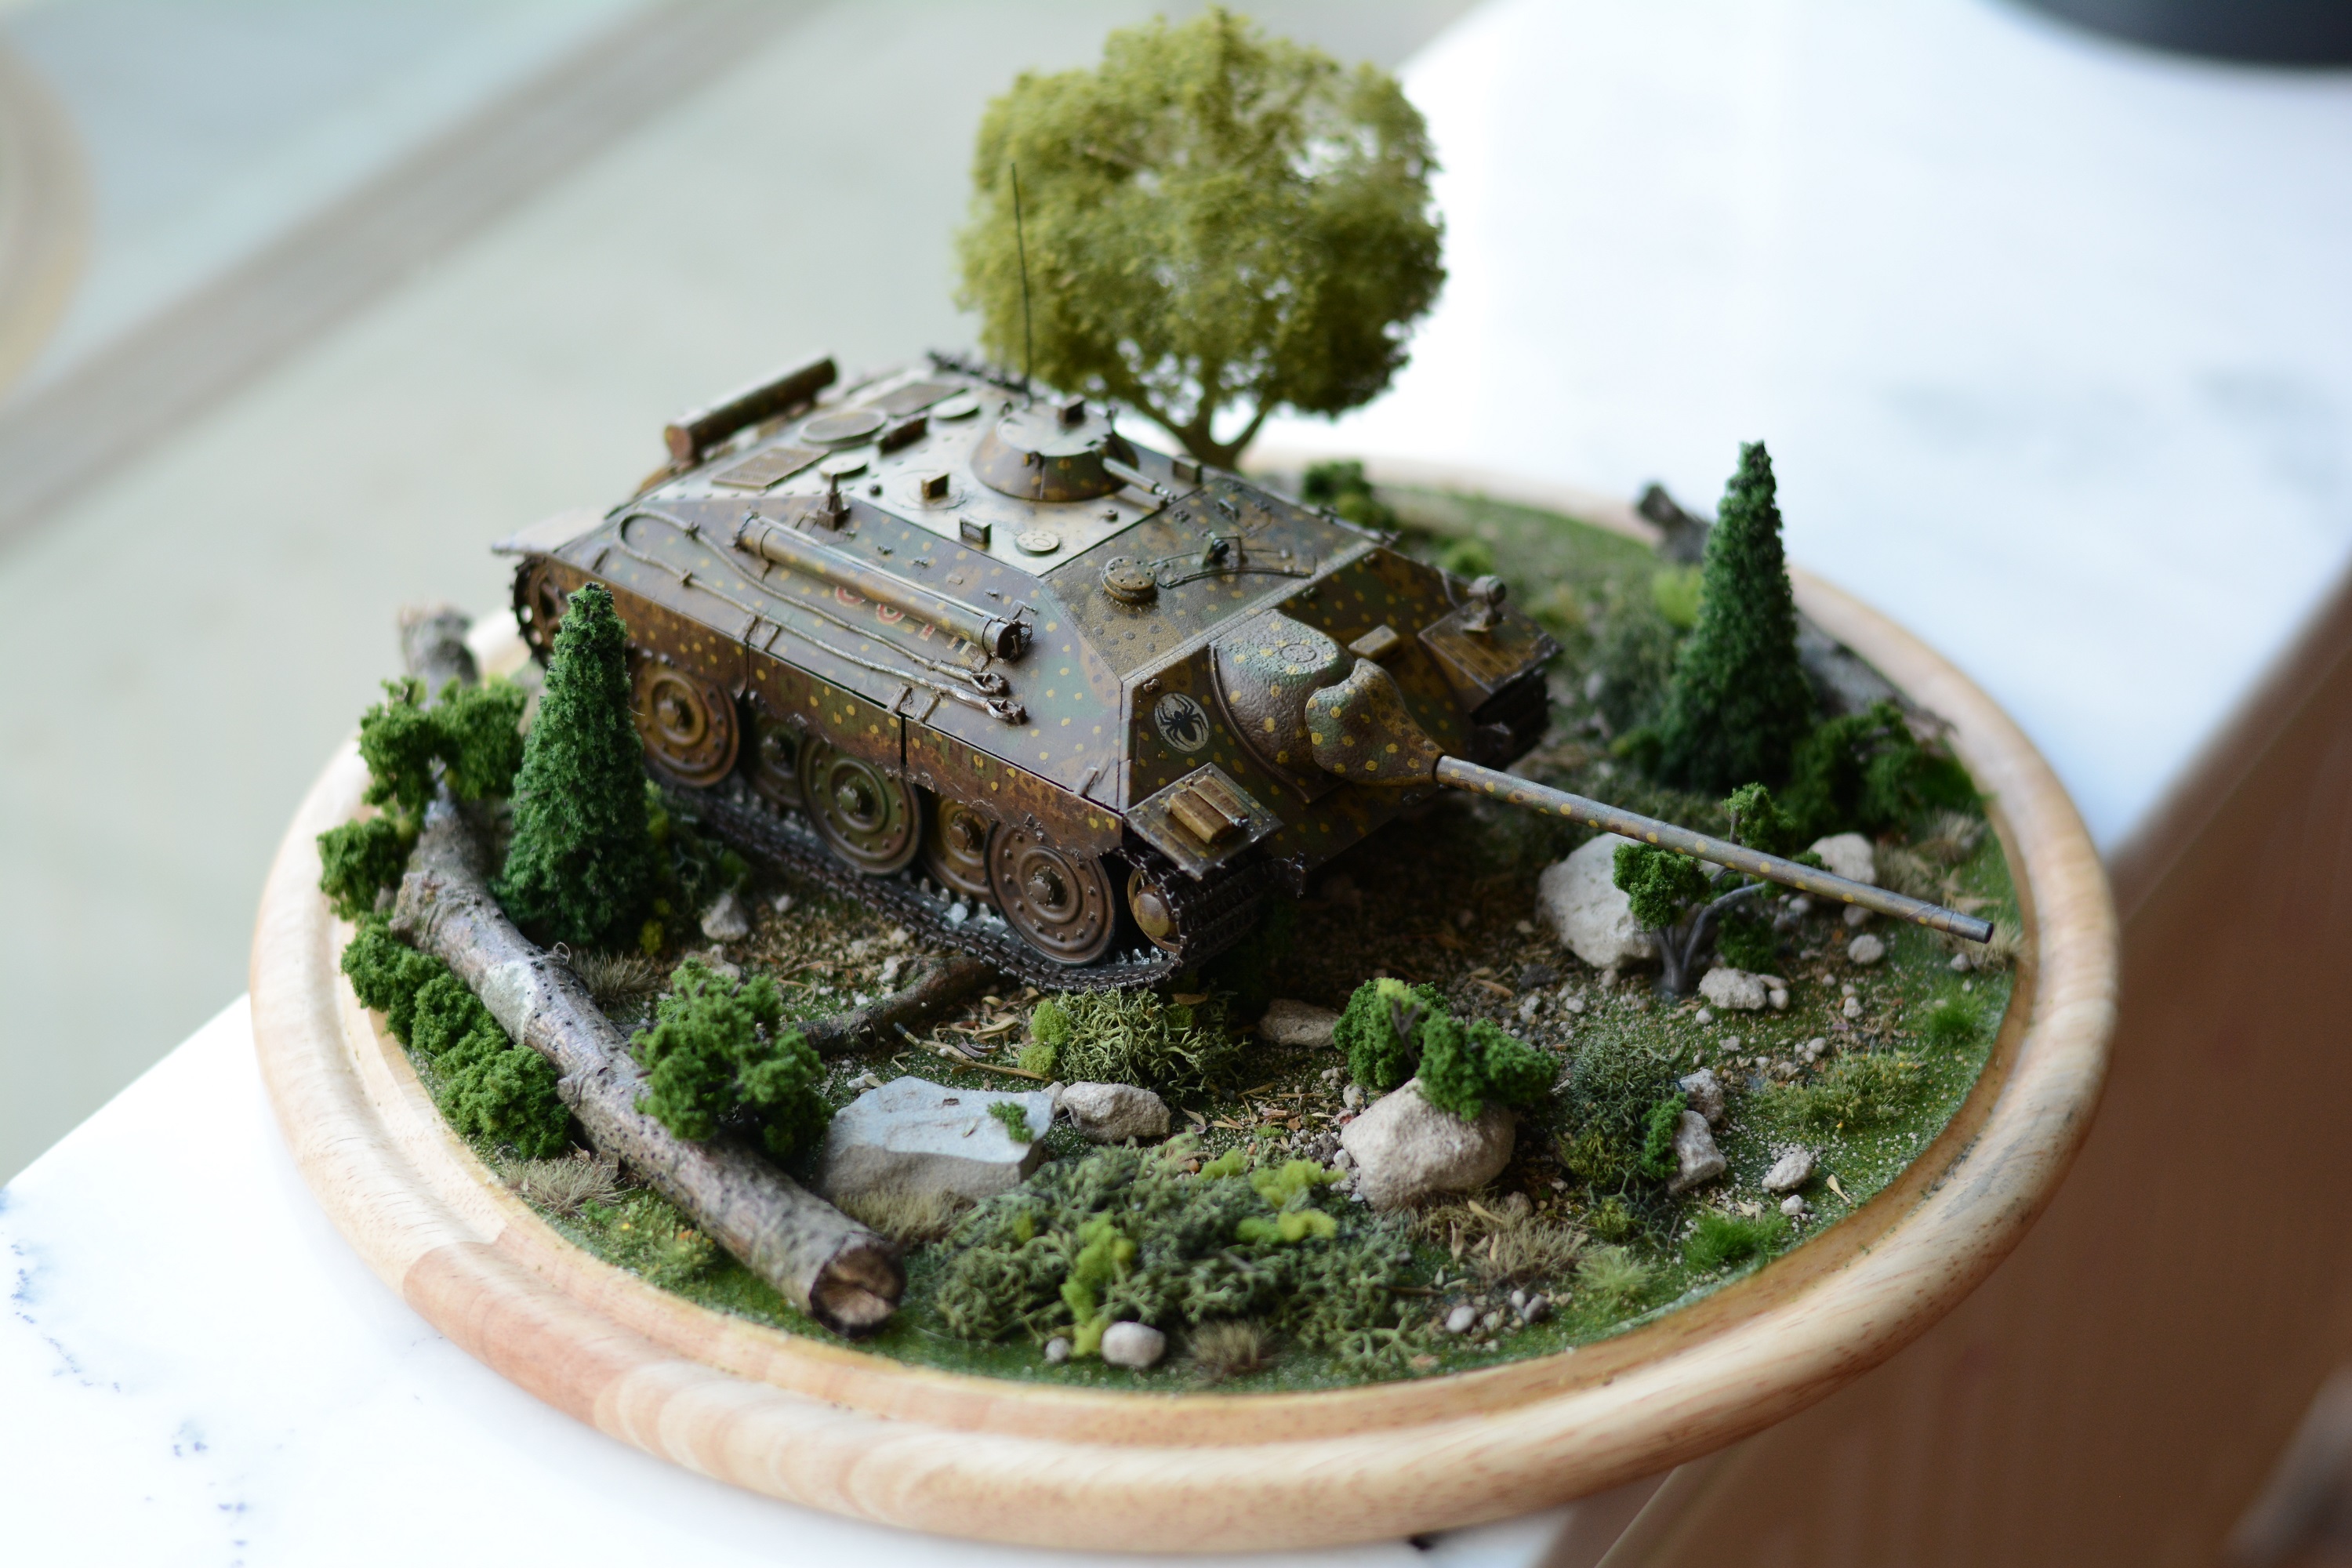
However!  I finished it today, base and all, and figured I’d throw in some pics of that:

DSC_5398 - resized

DSC_5390 - resized DSC_5399 - resized DSC_0103 - resized DSC_0104 - resized

Here’s the little monster in its best angle (I think).  I’ll probably enter this photo for a contest sometime soon.  Others follow…

I’ll point to a few details to call attention to them for techniques or stuff to try to use and issues had with them:

1.  The Schurzen from the photo etch kit – paint it alongside your model, but separate from it, and mask off the pieces that will be glued to the model.  Go ahead and attach the mounts after you do the wheels, but leave the plates off until you’re ready to start adding weathering.  I can’t tell you how many times those little pricks broke free while I was moving the model.

2.  I used white stucco paste for the caked-on mud, and covered it with Mig “dark mud” and then spotted with Mig “fresh mud” effects.  Looks good, I like the color, but the white stucco required several coats to really get rid of the brilliant white beneath it.

3.  I intentionally bent some of the schurzen with pliers to look like some close calls with trees, etc.

4.  I also used Mig “streaking grime” all over in little bits here and there, then going back and lifting up most of it with a brush moistened with thinner.  When you do this, do the lift SAME DAY, preferably apply to one panel and then remove from same panel as soon as it’s done.  I let one of the schurzen sit overnight (right front), and it shows, doesn’t look as good as the others.

5.  My base hull coat was in a German dark yellow from the “Flames of War” branded paint.  This paint dissolves in acetone.  I found out somewhat harshly (but thankfully in a way that was easily fixed) when I used acetone as a fixer for a dust pigment.  Note to self:  cover the hull with satin or other varnish before weathering.

6.  Clear gloss lacquer beneath decals is a great plan, works wonderfully.  Adding decal solvents to get rid of silvering completes the “painted on” look.  Acetone can then potentially bork your decals so again, varnish after.

7.  That boxy thing on the front right fender is the baseplate for the jack – generally it should be colored as though it was painted with the tank itself (new tanks on both sides generally had their equipment attached and it got painted over, after time tools would get lost or broken and new ones that weren’t painted would be acquired).

8.  Hairspray chipping technique on the muffler to give me some rust spots underneath – good stuff, but make sure you mask the paint if you’re about to varnish the thing, or the varnish will prevent water from getting in to soften up the paint.

9.  The rolled-metal barrel is a great gripping point for when you have to handle the model without breaking fragile spots.

10.  The photo-etch grab handles along the top on either side will break and disappear if you even look at them unkindly.

11.  The radio antenna is a bit of wire painted black and super-glued into a socket on the top.  Nothing special in its construction, just added a nice complete look to the model.

12.  The whole model was coated with a brown filter for German yellow vehicles, and also with a wash designed for the same color scheme.  I then used the streaking grime in a 50/50 dilution to create a pin-wash for a few seams and hatches.

13.  A little bit of black plus steel was then sponge-applied to spots where foot traffic would go, and a little around the edges to give a chipping effect.

14.  The base is a $6 cutting board I bought from the kitchen department of TK Maxx (TJ Maxx in the US).  I glued a trimmed “grass” from Woodland Scenics to it, then sprinkled with some cement dust from a local demolition site, some tiny gravel, and then dried thyme and oregano leaves.  Smells nice, too.  A broken stick from somewhere outside added larger “tree fall” elements.  Larger gravel pieces and some trees (a few of which I trimmed branches away from the trunk to look like bushes) from various manufacturers were added after that, and finally some various grass tufts which are available from most gaming-mini stores.

So…I’m getting there.  Not totally pro, but it looks pretty damn nice sitting on the shelf.

Next up…I’ll be doing a small USS Enterprise from the old Star Trek series for a friend’s “Man Cave” and then after that, I buckle down and start on the shuttle bay for my own 1/350th Enterprise Refit!

 

Posted in Build Log, Model Kits, ww2 | Tagged , , , | Leave a comment

Where all men go – and from which no man has returned before

This evening, I have several times felt myself on the edge of tears over the death of Leonard Nimoy. Scenes I saw from my childhood (as in, age 5 or less) keep flashing through my mind. I think if I were to spend any length of time contemplating the message of friendship in “Wrath of Khan” I’d probably upset my own kid with being such a crybaby. I never realized how much I valued his impact on my life and growth to adulthood.

Well played, Mr. Nimoy. You managed to set a course in my life I never even knew I was pursuing. And while some might find that revelation strange, I find myself comforted, and I genuinely grieve the sudden absence I am feeling.


Posted in Uncategorized | Leave a comment

Helga the Tiger – is up for sale

Well, with shelf space at a premium here, and a new E25 on the way, I’m going to put Helga up for sale – she was a lot of fun and a good ode to World of Tanks.  I really liked the contest idea (and I’m still trying to figure out who slammed 500 votes on me practically overnight at the end there), and I think she’ll make a great addition to someone’s PC desk or bookshelf.

I’m considering something like €150 + shipping, and I’m open to offers if that seems to steep.  I’ll pack her up well and make sure she’s insured as well.  The full build log will remain here, so the new owner can see the process that went into the build.

Here’s the photo essay again for those who don’t have the link.


The one, the only - it's Helga!

The one, the only – it’s Helga!


Posted in Model Kits | Tagged , , , | Leave a comment

E25 Tank Destroyer Build Log – Part 3

Photo-etch parts

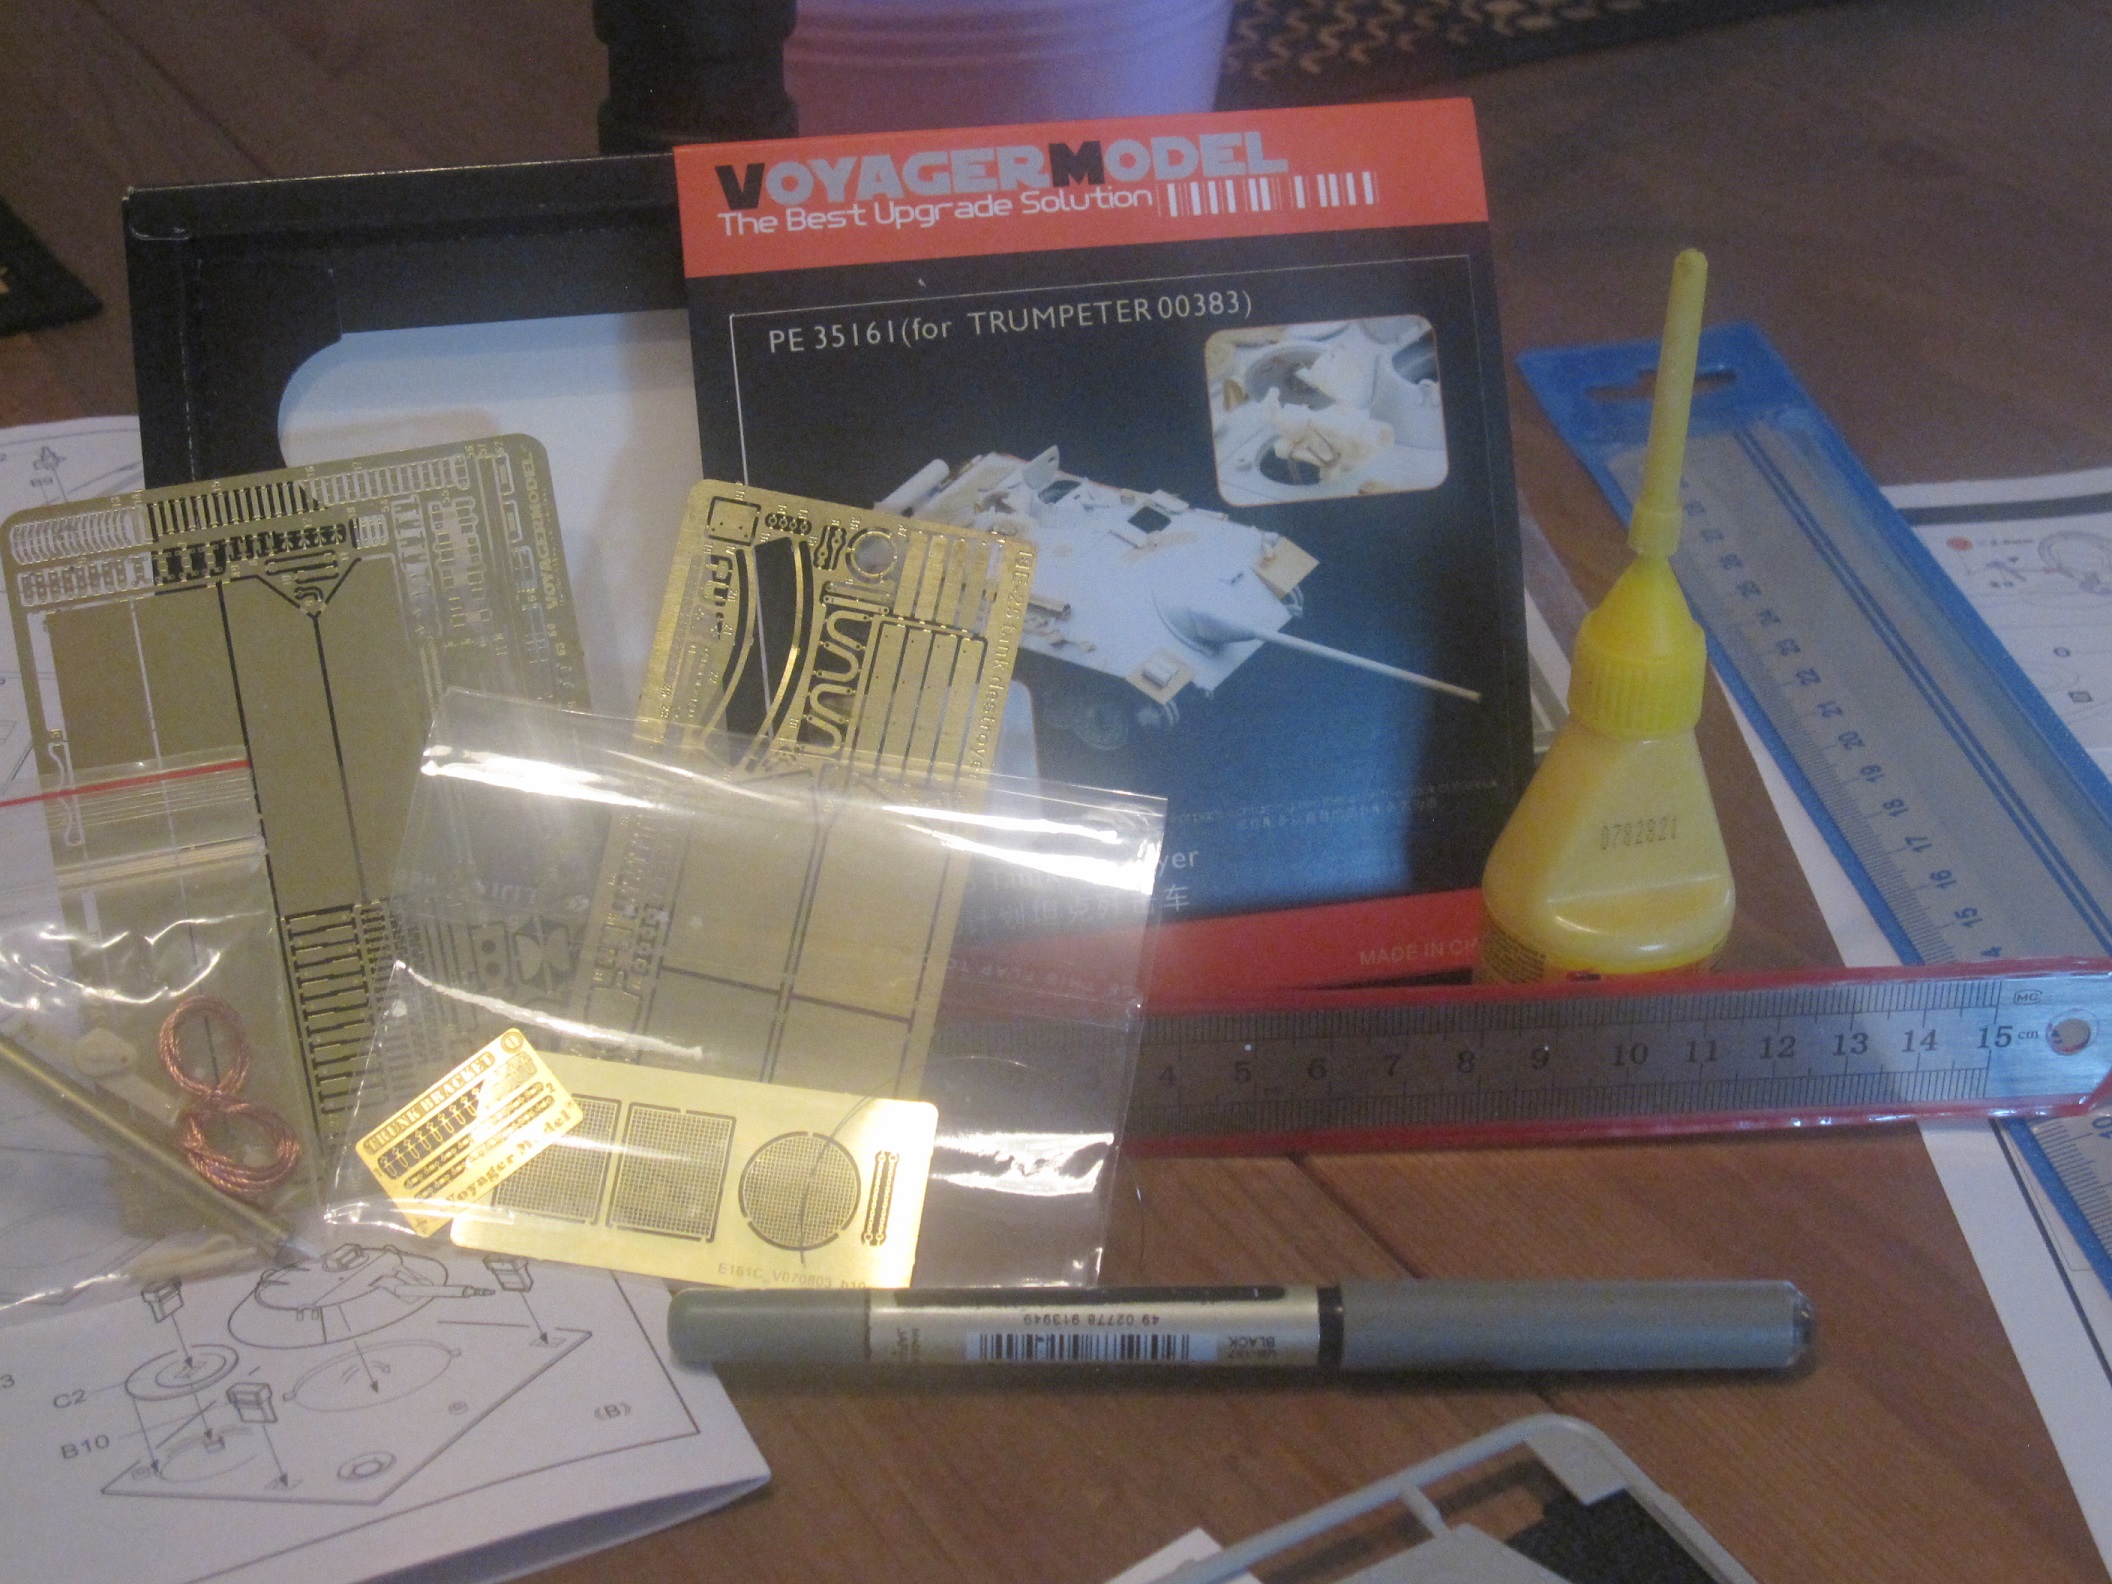
Although the Trumpeter kit does come with some photo-etch parts for grilles and fenders, there are a couple of extra 3rd-party PE kits to go with it that add an even more dramatic level of detail.

For this kit, I’m using the Voyager Model PE kit, although I won’t be using everything from it.  A lot of the parts from the Voyager set are interior bits, like hatch hinges, tools that are kept inside the tank, and in particular an infrared telescope that is meant to be mounted on the side of an opened hatch.  My intention with this kit is to have it in buttoned-down mode hiding in trees and foliage, so a lot of the bits won’t be needed for that.

Notice the comparison items here to give you some sense of scale.  Click this image to see the full size version.

Notice the comparison items here to give you some sense of scale. Click this image to see the full size version.

A note about photo-etch:  some bits are REALLY f***ing small.  Look in this photograph – you’ll see some parts here are less than 1mm wide – some are basically 1.0 * 0.5 mm in size.  If you have big hands like mine, this is going to pose a major challenge, particularly since getting brass PE to stick to plastic requires super-glue (cyanoacrylate).  I’ve included some common items like a pen and a container of glue as well as a small cm ruler to give you some comparison.

That’s not to say you should just forego PE if you have big hands – on the contrary, I think it adds a great deal to a kit and can really take the beauty of a finished model “to the next level” (I cringe at writing that phrase).  Just be prepared to have a lot of patience with it.  Also, if you’re going to be working with it, have a clean mat clear of debris beneath your parts and if at all possible, a very dark drop-cloth beneath your seat.  A rather powerful flashlight will also come in handy (because you WILL drop a much-needed part the size of a grain of sand on the floor, and the better contrast you can build up, the easier it will be to find).

In the orange box is the chisel - I use a 1mm head, and the yellow-grip pliers are smooth-faced to hold parts while I file the rough edges away.

In the orange box is the chisel – I use a 1mm head, and the yellow-grip pliers are smooth-faced to hold parts while I file the rough edges away.

In addition, a smooth-face pair of pliers (most pliers have serrated or rough faces to give better traction, you don’t want that) are really useful for holding PE parts without marring them.  A tiny-headed model chisel is also recommended for removing parts from the center of PE sheets.

When you remove the parts, generally you want to press down on the part with one finger while you apply the chisel to the connector, and make a habit out of this.  Some parts it won’t matter, they’ll be big, but if you’re in the habit, then you won’t have tiny parts go flying away into who-knows-where when you separate their last connection to the main sheet.  When you do apply the chisel, make sure you are going after the connector at the point where it contacts the sheet.  If you hit it right at the join to the part, you’re likely to warp the part and give yourself a headache trying to smooth the part out before applying.  Instead, leave a bit of the connector on the part, and when you have it free, grip the part in your smooth-face pliers with the connector exposed completely and the part itself just barely extending out.  Then use a good file with quick, light strokes to file away the connector in a lateral direction (across the length of the part, not against its thin side – you don’t want to end up folding or crumpling the part with your filing).

Make sure to think ahead and decide in advance which items you want to do and which you don't - and cross out the ones you don't on the instructions.  As you complete items, check them off so you know where to go back to when you return.

Make sure to think ahead and decide in advance which items you want to do and which you don’t – and cross out the ones you don’t on the instructions. As you complete items, check them off so you know where to go back to when you return.

As you pick-and-choose which parts will look best on your model, cross them off the instruction sheet that comes with your PE kit so you’ll know what you’ve done and what you aren’t going to do.  I erred in this way and ended up building the infrared telescope from the Voyager kit – ooops.  Although once I was done I was pretty proud with having finished it, there went two hours which I could have spent doing other bits on the kit.

Twelve parts, two hours, and a small part of what's left of my sanity, gone away forever.

Twelve parts, two hours, and a small part of what’s left of my sanity, gone away forever.


Ready for grab-handles and schürzen mounts, all the plastic has been shaved and sanded away.

Ready for grab-handles and schürzen mounts, all the plastic has been shaved and sanded away.

Some parts will require to to carve off sections of the plastic molding on the original kit parts – for example, grab-handles and mounts for side armor (schürzen) in the PE kit look much nicer than the little nubs on the side of the hull of the original kit.  (Big note on this one – this is where PE kits end up adding a crap-ton of extra time in building a kit – there are fourteen grab-handles and twelve schürzen mounts, each one is a multi-part assembly.  If you just want to build a kit and paint it up nice and be done, this is the kind of part you probably want to skip.)  In order to mount them nicely, the existing molding will need to be removed.  I use a standard Xacto or other razor knife to shave off bits at a time, always gently (except when I forget and apply too much force).

Notice the tiny little brass bits on the bottom - those had to be CA-glued to the resin.  I had to include this pic, to justify my actually building this part.

Notice the tiny little brass bits on the bottom – those had to be CA-glued to the resin. I had to include this pic, to justify my actually building this part.

When you are shaving these bits off, as I just said – do it gently.  If possible, make sure that the entire blade is parallel with the hull, so the hull serves as a guide to get a clean removal.  Once you’re down to just a few little rises (you’ll feel them still), you can reverse the blade and drag it backwards over the remainder with some pressure, and this can remove those last stubborn bits that keep evading you.  Finally, use a 600-grit sandpaper to smooth things down.  You may also find that the removal process has left faint outlines of where the old elements were – this is a good thing, because that’s what will guide you on where to place the new PE parts!.

Because it's hard to build models when half your hand dangles like a zombie.

Because it’s hard to build models when half your hand dangles like a zombie.

Hey, did I mention you should go gently?  There’s two reasons for this, and they both have accidents as their point.  If you find yourself exerting any kind of significant force (and by “significant” I mean more than you would consider needed for cutting through a skinny little piece of plastic), something is about to happen.  That something is either the blade will slip free, or the part you are cutting will sever – in which case, you have a blade with a good bit of force behind it suddenly moving somewhere you didn’t expect.  Depending on the fulcrum of your grip, that somewhere is either going to be into the model, or into your off-hand.  Either way it’s going to make a mess of your model, either by putting a big gouge into it (repairable with putty, I hope), or a big blood-spatter onto it (generally washable, but gross).  You’ll also end up pissing yourself off, pissing off those who care about you, and if you’re really unlucky, you’ll entertain some ER doctor when you have to explain why (s)he is having to sew your thumb back on.

Okay, see you later, once I’ve done some more.


Posted in Build Log, Model Kits | Tagged , , , | Leave a comment

E25 Tank Destroyer Build Log – Part 2

Back again – sorry for the delay in posting, but our living room lamp blew out and I haven’t had an evening with sufficient light to do any work.

Tonight I’m going to be talking a bit about the suspension, some pre-painting on the wheels, and more about the roof options.

The Suspension

On the Trumpeter model, the suspension units for the E25 are pretty simple – they are three-piece elements (two sides and an end-cap) that end up looking deceptively similar.  As well, there are extra pieces on the sprues to make more suspension units – but only enough endcaps for the exact number – which initially threw me off as I ended up with too many for one side and not enough for the other, but once I discovered my error it was quick to remedy.  Fortunately I figured out what was up before the endcap’s glue set, so I was able to remove it and apply it to a new unit.

The assembled sides, minus endcap

The assembled sides, minus endcap

End-on view, showing axle extension

End-on view, showing axle extension

The first step of the kit instructions will have you building a total of twelve suspension units, and the second step will have you plugging them into the lower hull.  The instructions don’t, however, explain which ones go to which side (not really necessary, as they really only fit one way).  Just lay them out once assembled so that you have your six for left and six for right grouped properly.  It was also helpful for me to put them in order – each suspension unit has either a long or short axle extension, as the wheels will be interleaved with one another.  The one shown above is a long axle unit, with no endcap.  Once on the hull, they are placed in order long, short, long, short, long.


Once you plug them into the hull (and the pic below also shows some extra parts installed), it’ll look like this:

Note the placement of the axle extensions - long-short-long-short-long

Note the placement of the axle extensions – long-short-long-short-long

Wheels

I haven’t attached the wheels yet, probably will save them for late in the build, but I did pre-paint them on their sprue to go with the ambush camouflage I’ll be using.  Here’s how I went through it:

First, black primer.  Second, German armor yellow as a base color (I had a spray can of Flames of War “war paint” in the right color available, otherwise I’d have air-brushed them with middlestone or something similar.  Here’s the sprue with the base color:

German Armor Yellow, Done.

German Armor Yellow, Done.

Next step, I chose to keep two of the wheels on each side in the base color, so I masked two wheels and their hubcaps with standard masking tape.  After that, I decided I’d do two wheels on each side in green, so I hit the next four wheels and caps with German Green.

Green Wheels, Done.

Green Wheels, Done.

Lastly, I masked those off and hit the remaining two wheels and caps with a dark German Armor brown (pretty close to a chocolate brown).

Brown, Done.

Brown, Done.

I set the whole sprue aside, I’ll deal with it and the tracks later.

Roof Options

I was pretty sure early on that I’d be building a model with the machine-gun turret installed, but I went ahead and built both roofs (leaving off the unique parts for the one I was going to keep and use) just for completeness.  Conveniently, all the parts which are separate for the two options are kept on different sprues.

Each pair of options is found on a separate sprue, so if you know which you're going to be using, you can set the other aside.

Each pair of options is found on a separate sprue, so if you know which you’re going to be using, you can set the other aside.

For the non-turreted version, I discovered that it was pretty easy for me to make the mistake of assuming that everything was going to be sealed up – not so fast!  The main hatch is actually a double-hatch, and the smaller of the two is described in an open position in the instructions (for the record, if you want to build the kit in buttoned-down mode, the parts fit perfectly).

Roof Option 1 - with binos attached.  Note the messy rim around the hatches - I was too quick to act and glued them in buttoned-down mode before realizing the binos extended up through the smaller hatch.

Roof Option 1 – with binos attached. Note the messy rim around the hatches – I was too quick to act and glued them in buttoned-down mode before realizing the binos extended up through the smaller hatch.

This stuff is in step 9 of the instructions, and it’s the first part.  There are two pics of the roof, the left one is of the top and the right is of the bottom.  One tricky piece to assemble is the binoculars – the binocs are cast as being folded straight up, and they slot into a retaining bracket which will get glued up against the underside of the roof.

The Binoculars attached to their mounting bracket

The Binoculars attached to their mounting bracket

The mounting bracket for the binos glues to the underside of the roof, right next to the hatch.

Note the positioning of the binos relative to the hatches.

Note the positioning of the binos relative to the hatches.

Once attached this way, it can be difficult to find a way to place the piece somewhere that won’t deform the binos, but the corner of the box happens to be a perfect spot.

Just set it aside and let it dry a while.

Just set it aside and let it dry a while.

Unlike option 1, option 2 is a bit more straightforward.  The MG turret fits clean (though I did trim the retaining flanges a little bit to make it swivel a bit more easily), and all the bits are pretty easy.  I’ll push a few pics of it up on my next post.  I’m also starting in on some resin and photo-etch extras, so I’ll cover a couple of those on the next post too.

Posted in Build Log, Model Kits | Tagged , , , | Leave a comment

New Build Log: the Trumpeter E25 Tank Destroyer

Hi all –

Quick post today – last night I started the build on the E25 Tank Destroyer, as produced by Trumpeter.  I’ll post a quick update later tonight, but last night I did up the suspension units and some small lower-hull details.  I’ll take a photo and post that later too.

Meanwhile, here’s the original unboxing vid I did when I first bought the kit:

https://www.youtube.com/watch?v=RR_xQHQ5BSg

Posted in Build Log, Model Kits | Tagged , , , | Leave a comment

WE WON!

We came in first! I want to thank everyone for the votes, even though most of you don’t know me, it’s still great to get that upswell of support – very much appreciated, especially the strangers among you who just looked and said “Yeah, that’s cool!”

And in keeping with my own contest, I’ve just spent the last hour dorking around in MS Excel grabbing all the names of the “likes” and turning a random number generator loose on them to determine THE WINNERS of my own contest! (I’ve excluded my wife from the list – sorry honey, but I know you don’t want to play tanks anyway smile emoticon ).

AND THE WINNERS ARE….

In third place, winning an account bonus code for new players that includes 7 days Premium membership and 1000 in-game gold currency – Xiaonan Xu of Hangzhou, China

In second place, winning an account bonus code for new players that includes 7 days Premium membership and 1000 in-game gold currency – David LeBlanc who apparently is a member of the Canadian Forces

and in first place, winning an account bonus code for new players that includes 7 days Premium membership and 1000 in-game gold currency along with the German tier 4 premium heavy tank, the Panzer Kpfw. B2 740 (f) …

(wait for it)

drum roll

(wait for it)

Brian Post, of Tucson, Arizona!

Congrats to the winners, and once again thanks to everyone who voted! Helga (the Tiger) is most grateful as well, and we’ll see you all out on the battlefields!

(Winners of account and tank codes – you have been alerted via personal message on Facebook with your bonus codes, and if you need instruction on how to use them, just let me know and I’ll show you.)

Posted in Uncategorized | Leave a comment

Made it to the top 18 entries…

Well, my Tiger (build log previously entered) has made it past the judges and is now in the top 18 entries for voting – if you do like the thing, I’d appreciate it if you visit their FB image and throw me a “like” there :).


I’m going to turn this into a contest of my own:
With the model, it came with three bonus account codes, each of which has seven days’ premium and 1000 in-game “World of Tanks” gold currency. I will randomly select three people from among the “Likes” and give these codes away to those winners!

It also came with a bonus code for an in-game premium vehicle – if this model gets first place, I will also randomly award that to one of the three people who win the account codes.

So – good luck, everyone, and thanks for helping me!

Posted in Uncategorized | Leave a comment

Build Log: Italeri “World of Tanks” Tiger 1 Model – Final

Here’s Helga, all done up!  I still intend to go back some time and add some basing, but I haven’t figured out what kind of terrain to site her in.  Meanwhile, I hope you enjoy the pics (large versions are available by clicking on these).

Update:  here are the links for the remainder of the build log entries:

First Entry; Second Entry; Third Entry; Fourth Entry

Coming to a town near you!

Coming to a town near you!

View from the left, with the extra cable

View from the left, with the extra cable


From a slightly higher angle...

From a slightly higher angle…


A view of the wear around the tow cable

A view of the wear around the tow cable


A common spot for a tank like this to take a shot

A common spot for a tank like this to take a shot

Another "weak spot" people tend to aim at

Another “weak spot” people tend to aim at


A little view over the rear deck

A little view over the rear deck


A profile view

A profile view


A bit closer on that profile with more turret detail

A bit closer on that profile with more turret detail


Profile from the other side

Profile from the other side


A little more detail on the right of the turret

A little more detail on the right of the turret

All in all, I had a good time building and painting this up – it was a really fun assembly (and challenging where it needed to be, easy where I wanted it to be), and it looked great in the final.  Putting the weathering on was a breeze (even dusting over the decals came out really fine), and I was quite happy with how the ambush camo pattern worked out on it.

Wish me luck on the contest, and I’ll let you know when the next build log is going up!


Posted in Build Log, Model Kits | Tagged , , , , , | 1 Comment

Build Log: Italeri “World of Tanks” Tiger 1 Model – cont’d

Part 9

Approaching “done” status on the model itself – for the time being I’m going to leave the base very plain, but I’ll probably revisit it at some point to add some terrain and give the weathering on the tank a little more character relative to that basing.

Now, I’ve glued the gun into position (turret is left rotating), all the decals are in place, a matte coat has been applied, and I’ve used a couple of pigments for dusting and smoke effects (mostly around the mudguards and engine grilles, respectively).  While this finishes drying completely and I put on the final matte coat, I wanted to call your attention to a few details that you should be very careful of when doing your own version of this model.

Namely, the fragile stuff:

What a pain in the butt!

What a pain in the butt!

First off is the engine crank – it’s the long bar that mounts under the exhaust on the rear right of the hull, it’s a very thin piece whose end hangs down beneath the tow hitch.  I recommend not attaching this until you are almost done, as it extends down into space that your thumbs and fingers naturally want to travel while grasping the model.  Recipe for breakage.  I almost snapped it a few times myself.

Hatch handles and machinegun - handle with care

Hatch handles and machinegun – handle with care


Top machine gun – I’m 50/50 on whether to save it for the end.  I managed without any real close calls, but if you’re as clumsy as I can be sometimes, it might be worth saving for later.

Tracks – the two forward sections that mate the drive wheel with the top and bottom long pieces are particularly fragile and susceptible to pressure in the wrong places.  I broke them a couple times while manipulating the model.  Nothing fatal, they glue back fine, but better to be careful.

This is an ooops! waiting to happen

This is an ooops! waiting to happen

Headlamps – these are mounted on skinny little posts and are very easily snapped (I did snap one, and although they glue back pretty easy, I thought it looked better with one snapped off, added to the “used” look of the tank).

Hatch handles – there are two that I’m specifically thinking of, both on top of the turret.  Verrrry easily broken if you put your thumb in the wrong spot.

By the way – in the pic above the hatches on the turret are half-open.  This was intentional on my part, I wanted originally to make this model in the process of “blowing up” (which is probably the most accurate depiction of a Tiger 1 in WoT), but the model just came out too pretty for me to do it.  So later on I readjusted them and glued them down.  I’d recommend you choose one way and not change your mind, as it was a bit of a pain to get them mounted correctly afterwards.

Turret-locking flanges – on the bottom of the turret, there are two flanges that key into the lower hull through slots, and enable the turret to rotate while remaining securely level with the hull.  These are really too thin to be reliable, and getting the turret into the hull ends up requiring an alarming amount of pressure once you’ve finished painting.  Generally as a rule I feel that if you have to apply serious pressure to something, either you’ve done something wrong or the model casting isn’t quite right.

Next, a couple pointers if you’re going to try to do a completely accurate WoT version:

The following items were included in the instructions, but produce an inaccurate representation of the in-game model (however, they end up looking a little more cool, in my opinion).

Turret machinegun – leave it off.  Keep the mounting ring, but slice off the mount for the machinegun and don’t bother installing the gun itself.

Headlamps – in-game, the WoT Tiger has only one, mounted centrally, on a hanging mount that extends from the top front plate.

Turret side-hatches – there are two of these on the model in the instructions, both attach just forward of the rear cargo box.  In-game there’s only one, on the right side.  The model kit includes this hatch on the “D” sprue, but it’s covered with zimmerit, so you’d have to do some sort of putty filler to smooth it out.

Exhaust cowlings – in-game the model has rounded cowlings (on the “D-with-zimmerit” sprue), kit instructions lead you to the angular ones.  I personally really liked the angular ones, so went with those.

Long crow-bar – this is the really long bar that mounts just ahead of the turret ring.  Doesn’t exist in-game.

Bolt-cutters – just to the right side of the forward turret ring.  Don’t exist in-game.

That’s all I could spot.  Hope it helps, but like I said, I think it looks better the way the instructions said, but your mileage may vary.

Other entries in this build log: First Entry; Second Entry; Third Entry; Final

Posted in Build Log, Model Kits | Tagged , , , , , | Leave a comment