Build Log: Italeri “World of Tanks” Tiger 1 Model – cont’d

Part 6

Model with the dots applied

Model with the dots applied

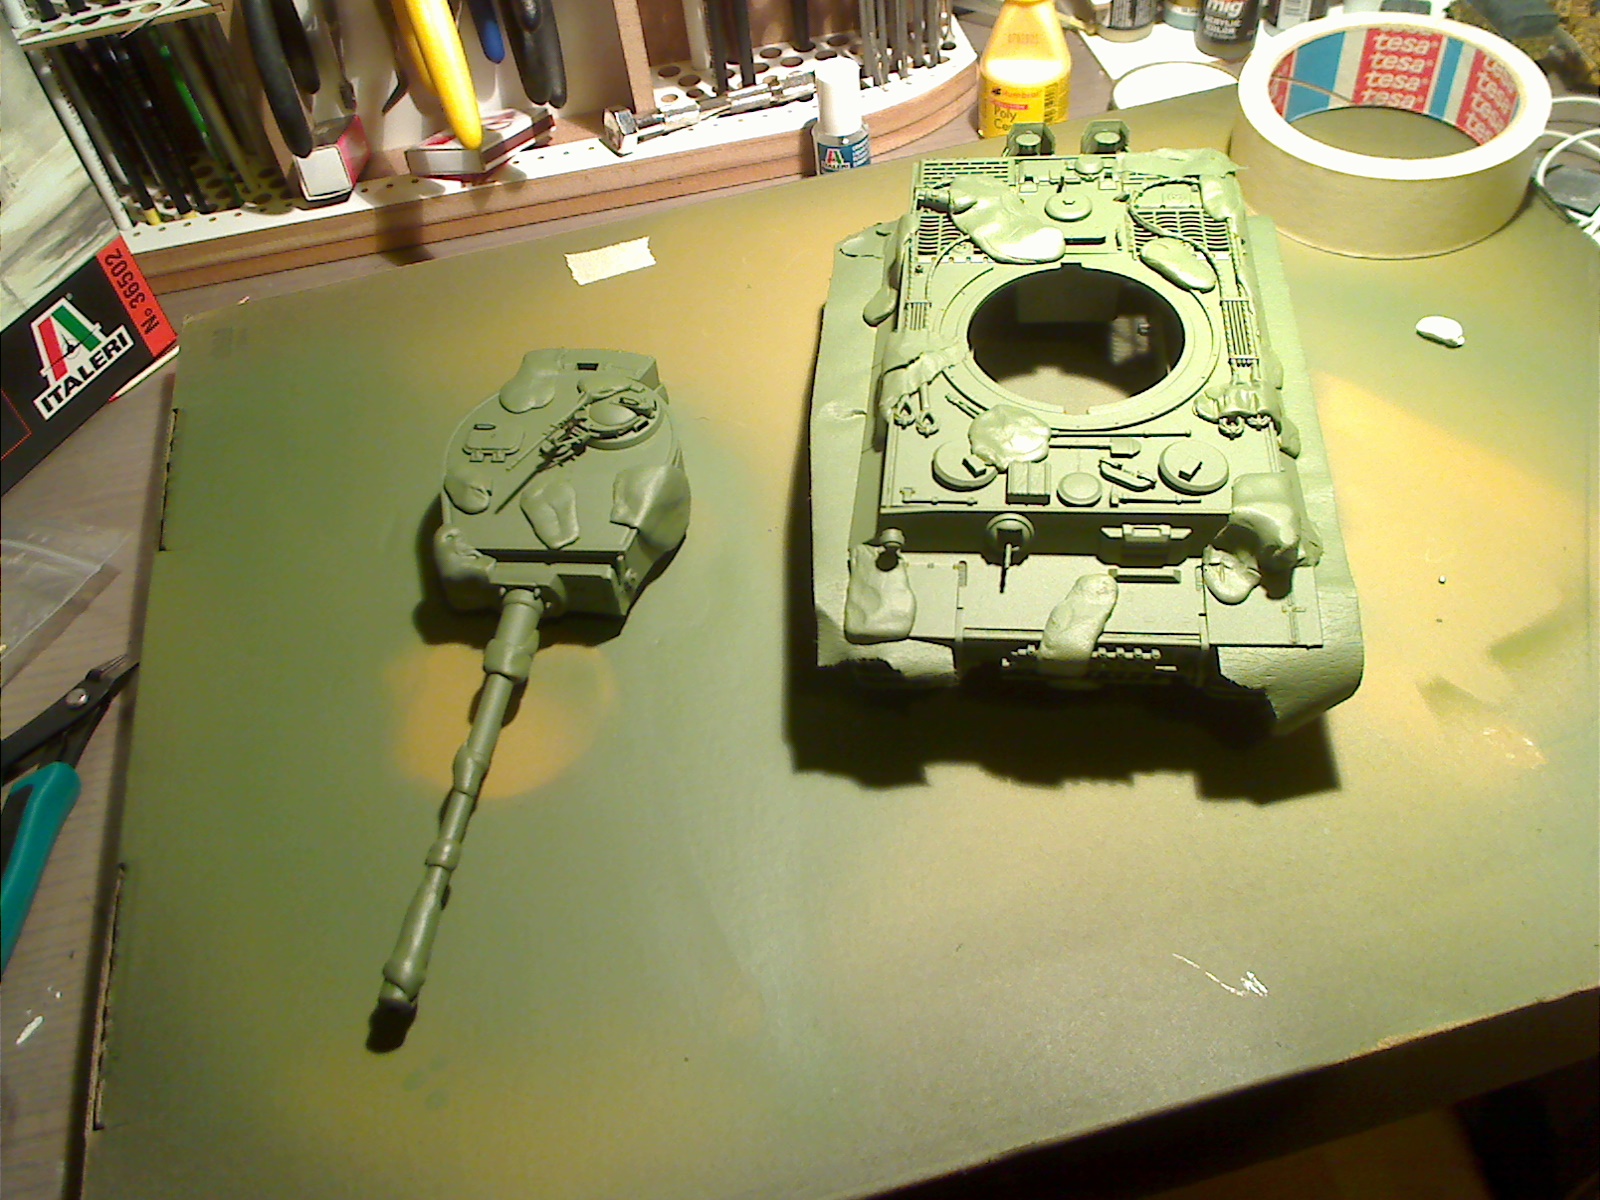
Not a lot of action today, though it might look like it – I applied the “dots” of the ambush camo pattern today, and that’s likely to be it for the day.  I used middlestone and chocolate brown for the dots on the various bits.  Tomorrow I’ll apply some gunmetal to the machineguns and tool heads, beige or something similar to the tool handles, and most of my effort will then go to the tracks.  After that it’ll be weathering time.

I pulled out a beech cutting board I bought from a discount store which I’ll use as a base.  For now, it’ll be a plain-jane base and I’ll fix the model to it with a nail or two, but later I’ll go back and add some ground and proper vegetation.

That’s the news…more when I post it.

Part 7

Hi everyone, back again.

Equipment, guns, and weathering applied

Equipment, guns, and weathering applied

I tackled the tracks today, along with the details of tools and machineguns, highlighting, weathering, and putting some shell-holes on the commander’s cupola and forward machinegun port (traditional aiming spots for low-level TDs like Wolverines, etc.).  Bit of a pain in the butt to go over it with a metallic highlight, but I’m of the school of thought that says weathering of that sort should be hinted at rather than overblown (on 15mm scale, that is reversed or you lose it, but on 1:35, overdoing it makes the model look like a big turdnugget).  In-game, the Tiger has steel showing through on practically every corner or crease, and while that looks good in graphics, on a model it would come out gaudy and unrealistic.

A little gloss coat where decals are supposed to go makes a BIG difference

A little gloss coat where decals are supposed to go makes a BIG difference

I don’t have good pics of the tracks right now, mostly I was focused on the hull and turret, but I’ll shoot a few pics with the tracks visible when I get it on the base.  Meanwhile, notice the glare on the shot above?  That’s intentional – I’ve brushed on some gloss coat where the decals will go, tonight.  Gloss coat makes for a really smooth surface, and prevents air bubbles from staying behind your decal (which can result in “silvering”, where the film on which the decal sits shows up visibly – you want that to not appear at all, the decals should look as if they were painted on).

I also noticed something while picking out the decals from the sheet – as a whole, the decal sheet isn’t the best quality I’ve ever seen.  It’s workable, but the decals themselves look a little too fuzzy.  It’s possible that this was intentional, that they were printed “pre-weathered” to match in-game styles, but when I was looking at them initially I was feeling a little skeptical.  I’ll update again after I put them on tonight.

Part 8

All the decals are on - they look pretty good

All the decals are on – they look pretty good

All done with the decals – and I was wrong about them being bad, they were just designed with a little “pre-weathering” on them already.  They look just fine.

Other entries in this build log: First Entry; Second Entry; Fourth EntryFinal

Posted in Build Log, Model Kits, Uncategorized | Tagged , , , , , | Leave a comment

Build Log: Italeri “World of Tanks” Tiger 1 Model – cont’d

Part 3

Using tack paste, we cover the spots on the hull that we want to remain yellow

Using tack paste, we cover the spots on the hull that we want to remain yellow

Today’s operation was pretty simple – I used tack paste (Brits call it “blue tack”, don’t remember a US analog for this stuff – it’s basically a gum paste that people use to stick posters and things to walls) as a masking element with a bit of regular masking tape to help out here.

My local version of tack paste.

My local version of tack paste.

Almost any kind of tack paste works, the stuff I get seems pretty specific to Germany, but you’ll find similar all over the world.  The principle is that where I put the mask, the model remains the original sand yellow color.  So once I had the tack where I wanted it, I sprayed the whole thing with the next color in line – German Army green.  Flames of War folks know this stuff as “reflective green,” and this is close, but it’s a genuine army paint here.

Tack paste masking on the turret

Tack paste masking on the turret

Tomorrow this stuff will have dried completely, and I’ll add more tack and tape to cover up about half of the remaining exposed space, and then hit it with a full coat of German Army brown.  After that’s dried, I’ll peel off the tack & tape, and I’ll be left with the tank in three-tone base for its camouflage.  After that it’ll be a matter of adding spots (traditional German ambush-camo had contrasting spots, and the WoT version was much the same).  Although the original “real life” versions also had the track wheels done up, in WoT the wheels were armor gray, so I’ll hit them up with that after masking away the rest of the hull to avoid spillage.

Then it’ll be time for a few details, like metallics on the machine gun, and some track details – then scarring and weathering for the whole thing.

Part 4

Fresh tack and tape applied

Fresh tack and tape applied

Okay, I’ve applied more tack and a lot more masking tape to the hull and turret, now that the green has had a chance to dry.  I use a lot more masking tape now, because the job at this stage is to break up the large areas, and preserve some spaces that will remain green.  Since now there’s a pattern beginning to build up, masking tape works as a “bridge” between areas of tack, and the extra tack is only really needed in spaces where the tape is too big or threatens surface detail.

I have to note here, artists call this work “negative space” – since what I’m doing is technically preserving a color rather than applying a new one (though I’m also doing that).  I find this one of the hardest parts of modeling for me to wrap my brain around.  I’ve been doing progressive layers upon layers in the past, and it’s very hard for me to grok the concept of picturing how the model will look after applying the next coat.

Fresh tack and tape applied

Fresh tack and tape applied

Now that this stuff is on, I’ll hit the wheels up first with a coat of light grey (to match what’s in the game).  After that’s had a chance to dry, the armor brown will go on over the rest, and then that’ll be given some time to dry before peeling off the masks.

One note on the “blue tack” crap – that stuff is re-usable.  Even after you spray paint it, you can still ball it up and it’ll retain its tacky nature, so you can use it again and again and again.  Eventually it’ll lose its ability to cling, but that’s a long while out, and if this model goes well I intend to do similar jobs to a bunch of my 15mm-scale Flames of War Germans.

And maybe to that E25 that’s been sitting on my shelf for a verrrry long time, begging me to paint it in action!

Part 3

Alright, the tape and tack are off – and it looks pretty good!

One note – when removing tack from your own models, be very careful with and around delicate parts.  This stuff can be hard to peel off, and it might take handles, antennae, or headlights with it.  Also, some brands can be a lot more “gluey” than others, and hard to pull away.  If you experience this problem, ball up some of the tack and use it to pat on the stuff still attached to the model.  Repeated patting will get the stuff to stick to itself, and you’ll peel it off the model without too much trouble.

All the tape and tack are off

All the tape and tack are off

Other entries in this build log:  First Entry; Third Entry; Fourth EntryFinal

Posted in Build Log, Model Kits | Tagged , , , , , | 2 Comments

Build Log: Italeri “World of Tanks” Tiger 1 Model

I picked up one of these models to participate in the WoT contest coming up, and figured I’d keep a build log as I went along – so if you like building models or just want to see some of the basics of how it’s accomplished, read on :).

PART 1:

Alright – I won’t bore you with the individual parts step-by-step of assembly, but I will give you a broad overview and a tools list for it.

Sprues – generally the parts sprues were pretty clean, very little flash, and fit was very good.  The model from which this one was drawn has obviously gone through a few generations, and we’re seeing the benefits of that.

One thing I didn’t notice at first:  there are TWO “D” sprues.  One with the original zimmerit Tiger parts, and one with the clean-sides WoT parts.  They have a lot of overlap in parts, but the original zimmerit sprue contains some elements that are not duplicated.  Italeri fortunately calls out the WoT-specific stuff with red highlighting in the instructions, but I didn’t really understand that until I was a good way in.  Didn’t cause me any problems, just a little anxiety when thinking that I had some missing bits.

Decals – some good memorable WoT items there, which I’ll use on my build.  No decals from the original Tiger model are here, so if you’re looking to use this kit as an authentic-style WW2 model, prepare for that.

Tools – in the build process, I kept my tool set pretty limited, since most people playing WoT won’t have a full bench like I do.  Here’s all I used during assembly:

  • Wire cutters (for snipping pieces off of sprues)
  • One set standard tweezers
  • One set spring-shut tweezers
  • One triangular-section file
  • One hobby razor knife
  • One pin-vice (the hand-held drill – I actually grabbed two when I started, but in the end only used the smaller bit, so one is all you need)
  • Glue from the kit (very thin with a brush applicator – particularly useful when putting tracks together, and for areas where the glue will “wick” up a seam while you hold it together with the other hand)
  • Humbrol poly cement (any brand will do, this one has a long metal tip for reaching tough spots, and I find this thicker form of cement is a little stronger than most brush-on varieties)
  • Two sheets white A4 printer paper (these sat under the model and under sprues – helps to keep an eye on tiny parts, makes cleanup of extra gunk easy, and keeps the wife from yelling at me if I spill glue)
Tools for the Tiger 1 build

Tools for the Tiger 1 build

Although there are many parts, most go together without any trouble at all.  The tracks will be the primary challenge of assembly (some sections need to be put together one link at a time, then formed to the wheels while the glue is still moldable – see the Italeri website, they have a good video demonstrating how to handle these).  If you put them together on a hard, flat surface, you can string 6-10 of them together before sliding them into position over the wheels.  The second-hardest assembly task is installing handles – these tiny little bits are really hard for me, because my hands aren’t as steady as they used to be.


Assembly completed

Assembly completed

Still and all, I got it done in four sessions of about 2-3 hours each while watching TV with my wife.  You can probably move faster than me.  I would have done it quicker, but two of those sessions were assembling tracks, and I didn’t want to turn the hull over onto a track that was still drying.  Safer to let it cure for a few hours or overnight, then do the other side.

I originally wanted to go with a “blown-up” vehicle, since that’s what Tigers are best at in WoT, but after completing it I decided it was just a little too pretty for that.  So instead it’ll get a camo job and a decent basing done before finishing.  I’ll still give it some battle-damage (some gashes, maybe a hole or two from a pesky E25 or Sherman), but the overall tank will remain intact.

One thing to note:  the instructions include a cupola machine-gun as part of the install.  This isn’t part of the in-game tank, if that’s what you’re really after.  I put it on because it looks cool.  Your mileage may vary.

Primer coated in matte black

Primer coated in matte black

After assembly, I primed it up with matte black all over.  (For reference, I use an acetone-thinned primer here, but I don’t have much preference.)  This helps to create shade effects as the black tends to give more depth beneath the surface paint job.  It’ll also make scratches look a bit more real and provide some good interior shadow.  The objective here is to look good for a camera, and for an observer approximately 1 meter away.


PART 2:


A handy bit of domestic larceny to help out with Helga the Tiger here

A handy bit of domestic larceny to help out with Helga the Tiger here

A quick update here – after the primer is completely dry (I leave it for 24 hours, probably not necessary to wait quite that long), I stole some of my wife’s hairspray and gave the model a good coat all over.  You can probably use el-cheapo stuff from the drugstore if you don’t have any handy in the house.  Really, any kind of hairspray will do the trick just fine.  Apply it and let it dry completely.  If you’re doing it on your workbench, make sure to stick a sheet of paper or something in between where your model is and any sensitive surfaces like magnifiers, electrical equipment, etc., or that stuff will get a coat of it on it as well.

The objective here is to give me a water-soluble base on top of my primer (which is *not* water-soluble), which will wait under my hull coat for when I’m almost done painting.  At that point, I’ll get a q-tip (you brits call them ear buds or something), soak it in water, and wet down edges and spots where crew would walk, then use the dry end or a toothpick (cocktail stick) to scrape away tiny little chips of the hull paint to give it some wear-and-tear look.  I’ll let this dry tonight, and tomorrow I’ll slap on the base hull color of a dark sandy yellow (not taxicab yellow, but more of a summer wood kind – WW2 fans will recognize it, it’s often referred to as “dunkelgelb” or “German yellow” among modelers).  Once that gets dry, I’ll mask off some sections and start developing the camo pattern.

Links to other entries:   Second Entry; Third Entry; Fourth Entry; Final

Posted in Build Log, Model Kits, Uncategorized | Tagged , , , | 2 Comments

Terms I’ve coined…

I just finished reading a blog post over at Coding Horror regarding that author’s top-30 favorite new terms, and I was sad to see that none of mine made it in, so here’s the first three I can remember:

“Borked”, of course – the term you use in polite company (such as a boardroom) indicating that the code or system to which you refer is in a state of total fucked-uppedness. 

“Deployarrhea” – the long, wet string of deployments that result from releasing a critical bug, then borking the fix, then realizing you’ve just dropped a Hindenbug, and so on and on.

“Bedsheet” – code that spawns soooooo many threads that it might as well be knitted into a blanket, since it locks the computer and sends it to sleep.

Have you come up with any?  Feel free to drop them in the comments and I’ll push them out here.

P.S. – I find it mildly humorous that this is page 666 of this site 🙂

Posted in IT, Software | Tagged , , , | Leave a comment

Movie Review: “The Amazing Spider Man 2”

Okay, so I saw this a while ago (bought the DVD when it was released):

Visuals:  5

Audio:  5

Plot:  2

Characters:  2

Action:  3

Overall:  3 (slightly better than a shit sandwich)


Well, I won’t hold back – this was a shit film.  Not quite as bad as Highlander 2, but bad.  I wasted the cash I spent on the DVD.   I took a risk, and it didn’t pay off.  This was “The Amazingly Bad Spider Man 2”.

I’ll start with the Characters rating, which in my view is the weakest point of the film.

From the very beginning we are presented with a Spider Man character who – thoroughly unlike the Peter Parker of Tobey Maguire portrayal – just doesn’t seem to care all that much about collateral damage.  He’s so busy showing off how much better he is than a common thief that he spends a few minutes blowing his own horn while around him the guy plows a semi truck through several intersections, probably killing quite a few people in the process.

He spends the rest of the film in some teen-angst-ridden inferiority complex, constantly showing off because he knows underneath he’s Spider Man.  I think maybe this is the actor (Andrew Garfield) just demonstrating his limited range, but he had to have had permission or encouragement from the director, so let’s spread the blame a little more evenly, shall we?

The villains – both “Electro” and the “Green Goblin”, are echoes of personalities with all the depth of a Bud Light commercial.  Electro is a passive-aggressive semi-genius with rage control issues who finds himself suddenly vaulted into super-hero power levels (and who nurses grudges for reasons only mildly related to reality), while Harry Osborne’s Goblin is the worst form of spoiled-brat charicature with delusions of Empire that one embraces the fact that he’s only a villain for the last fifteen minutes of the film.  Sadly, during those fifteen minutes we are assured that there will be a release of SM3, involving more fucknuts-dumb villains.

Come to think of it, maybe that’s the whole point – maybe Marc Webb realized this turdburger of a script was sooo bad, that he just directed it and the whole time was hoping to move on to the next project…because that’s what this felt like.  He just wanted to get it over with.  So did I, by the end.

Gwen Stacey is trite, boring, hugely cliché’, but at least she’s mildly realistic.  Until she’s dead of course, but we all saw it coming as soon as she gave her big “love every minute because you never know how long you have” speech.

Okay, plot – what plot? 

There’s one small subtext which explains the disappearance of Peter Parker’s parents and why he lives with his aunt and uncle.  That was mildly interesting and saved this film from a rating of 1.  The rest is just action-reaction to the presence of Electro and the teen angst that overwhelms the film.

Action

Yeah, lots of fighting.  Enough that you get tired of it.  Really.  It’s tiring.  In the earlier version of the films, directors knew to make the fights interesting, but keep them short – a fight is not the reason the film exists, it’s a friction point between the two or more competing characters, plus an opportunity to lighten or darken the mood as needed.  Here the fighting seems to be the reason the film was made, because it is lengthy, accomplishes no worthy outcome (aside from one extra opportunity to play the tired “itsy bitsy spider” joke), and introduces levels of collateral damage that would make anyone want to put a bullet into Spider Man’s head.

Visuals

The shooting was okay, no glaring errors in the cinematography.  It’s New York, it’s day, it’s night…ultimately a bit boring, really.

Audio

Competently driven sound effects and music.  Nothing to write home to Aunt May about.  Very little atmosphere of any kind.

Summary

Save your money, but more importantly, save your time.  Go rent Maleficent or something else if you’re in for a fantasy story.  I imagine Stan Lee, even with his cameo in this film, was regretting its production.

We miss you, Toby.  Yours was a very human Spider Man.  This one…this one was a cardboard cutout.

Posted in Movies | Tagged , , , | Leave a comment

How to make a UEFI-capable USB Windows 7 Install

Recently I bought a PC without an OS in order to get a copy of Windows 7 on it (because there’s no way in hell I’m going to let Windows 8 into my abode).  That PC was hyped to the gills (here’s my review of the manufacturer), and my RAID setup was using UEFI drivers and GPT-capable drives.  In order to use these properly and complete the installation of the OS, I needed to bridge the gap between the newfangled BIOS and the old-fangled DVD drive.

After a few adventurous attempts (all of which refused to show me the fancy-pants drive setups I have established in this case), I got fed up.  I finally decided to make a USB key into a Windows installer – and didn’t realize how painless it would be once I did.  That thing installed FAST.  So here’s my attempt to share the how-to’s with you.

First, you’re going to need a PC.  Set it up with RAID as you want it through your BIOS.

You will also need a genuine Windows install DVD (because I’m not going to recommend a pirated one, and I’m not going to answer questions regarding why your pirate copy won’t work right).

You’ll need a compression app installed (I’ve got 7zip, that works fine, there are others but I don’t know if they support the file formats you’ll be digging into).

Lastly you’ll need a USB memory stick with at least 4GB of space on it (my Windows Ultimate install was about 3.1 GB, but if you’re installing something else as well, you might need more).

Using another Windows PC (your old one, or a work one or whatever – note that I used a Win 7 one, I don’t know if the following description’s tools are available on earlier versions), you need to make that USB stick look like a boot drive.  Here’s how (you might want to copy these steps into a blank doc and print them out, then check them off as you do them):

  1. Log into your system with Administrator privileges
  2. Plug in your USB stick
  3. If Windows gives you the option to “open folder to view files”, do that. Otherwise open Windows Explorer (not Internet Explorer, I mean the Windows Explorer that shows you all your drives) and select the USB stick you just plugged in
  4. Open a command-line interface (Start menu > enter “CMD” and press enter – you’ll get a DOS box).
  5. In the command line interface, enter “diskpart”
  6. You’ll get a new DOS box with a prompt of “DISKPART>”
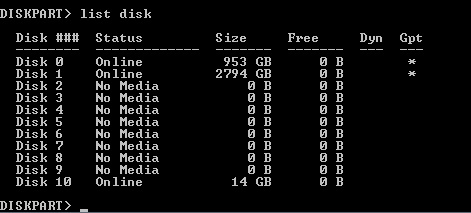
  7. In that DISKPART prompt, enter “list disk”
  8. You’ll get a listing of all the possible storage media (and some that might not even be there, like if you have a card-reader or something, it’ll show empty sockets as 0-size disks) on the system
  9. Figure out which one among that list is your USB stick. You probably don’t have many disks as small as the USB stick you just plugged in.  Mine was a “16GB” model, it showed up as 14GB in this exercise.  DiskpartSee the pic for an example.
  10. Now that you know which disk is the right one (make ABSOLUTELY sure for what you’re about to do), enter “select disk XX” where “XX” is the number shown in the list (#10 in my case).
  11. Now enter “clean” – this will wipe the drive of any contents it had (which is why you are making absolutely sure you’re on the right disk)
  12. Now enter “create partition primary” to make a basic partition on it
  13. Enter “active” to make that partition bootable
  14. Now enter “format quick fs=FAT32” to guarantee it is readable by even basic drivers
  15. Enter “assign” to give it a drive letter
  16. Enter “exit” to quit the DISKPART window and return to the CMD window
  17. Enter “exit” to quit the CMD window
  18. Now stick that Windows install DVD in your drive. Exit any autoloaded stuff that might start up.
  19. Switch over to that Windows Explorer window you had open from before. Select the DVD drive containing the Install DVD.
  20. Highlight anything in the right-side pane and press CTRL+A to select all the contents of the drive.
  21. Next press CTRL+C to “copy” the contents
  22. Now select the empty USB stick from among the drives in the left-hand pane
  23. Press CTRL+V to “paste” the copied stuff
    1. (steps 20-23 could be done drag-drop if you are comfortable doing so)
  24. Congrats, you now have a bootable install USB stick! But you’re not done, as this one doesn’t yet have UEFI / GPT support.
  25. Now that it’s all copied you’re going to need to rearrange some stuff on it.
  26. On the USB stick, navigate to the folder “..\efi” (.. means the root of the drive – so if it’s “C:” that means “C:\efi”)
  27. Inside this folder, create a new folder and name it “boot”
  28. Now navigate to the folder “..\efi\microsoft\boot”
  29. Copy everything in there using the CTRL+A then CTRL+C move you did before
  30. Return to the directory you just created (..\efi\boot) and CTRL+V all that stuff there to copy it there.
  31. If you’re currently on a Windows 7 machine, grab a copy of “bootmgfw.efi” from the directory “C:\Windows\Boot\EFI” (drive letter might be different if you’re booting from a drive other than C:\), and copy that file into the USB stick’s ..\efi\boot directory.
    1. If you were able to do this, skip to step 37, otherwise proceed to 32.
  32. Go to the directory “..\sources” and locate the file “install.wim” – this is an archive containing some drivers you’ll need.
  33. Open “install.wim” using your compression app (7zip in my case)
  34. Inside this file, navigate to the directory “1\Windows\boot\efi\”
  35. Find the file “bootmgfw.efi” in there
  36. Make a copy of that file (I had to extract one to my desktop to get it out of the archive, 7zip doesn’t support direct CTRL+C inside archives) and drop a copy of it into that “..\efi\boot\” directory you created in step 27.
  37. Now that it’s in the ..\efi\boot directory, rename “bootmgfw.efi” to “bootx64.efi”

Congrats!  You are all set up with a bootable USB stick that has UEFI drivers for Windows to use during install.

Next make sure your BIOS boot options on the new PC includes the potential for “removable media” or “USB” or whatever term it uses for “boot off my damn memory stick.”  In the case of my ASUS I think it was removable media.

Turn off the new PC.  Plug in your USB stick.  Turn the PC on.  You should now be booting up into a Windows installation – and when it comes time to pick the drive on which to install, it’ll show all your UEFI drives (like RAID setups) as options!  The rest follows pretty standard vanilla installation instructions for Windows, and you can probably handle that yourself.

Point of note – you might want to lock that USB stick into read-only mode and just park it somewhere in case you ever need to re-install (like if one of your drives fails and you have to recover from scratch).  Or burn it to a bootable DVD or something like that.

Happy computing!

Posted in Configurations, Disk Management, Hardware, PC Stuff, Problem Solving, Software, UEFI, Uncategorized, Windows | 3 Comments

Review of PC Maker Mifcom.de

I recently bought a new PC – what in my view was a super-boss update compared to my four-year-old former boss system.  I live in Germany, and my skill with the German language is both minimal and limited to either restaurant-ordering and grocery-buying.  So I was generally restricted to buying online.

Which is why I wanted to write up this review of the manufacturer of my new machine – Mifcom.de.

I’m going to open up with the following statement:  I was not solicited to write this by them, nor in any way do I gain from it.  They don’t even know I’m writing this, though I will share it with them when I’m done and it’s posted.

My buying experience with them was absolutely top-notch.  I did most of it over the course of a long research period in which I studied various vendors here in Germany, including several walk-in stores like Saturn and Media Markt, checking available features and prices.  I had originally thought to buy components and assemble it myself, but in the end the price differential was so little that the extra bonus gained by having them manufacture it and give it a warranty pushed me to buy direct from them.

So – here’s the run-down (score out of 10, 1 being low, 10 high):

Model Selection and Parts – 10.

No shit, a ten out of ten.  They have a vast array of pre-configured models fitting practically any budget in both laptops and desktops.  This also includes many models which are tailor-made to handle specific needs – Flight Simulator models, gaming laptops, FPS-specific machines, silent gaming designs, enormous water-cooled Xeon boxes with all the stops pulled out (if I had 15,000 Euro to drop on a PC, hoboy would I ever!), or bare-bones budget models, the selection is almost too broad to choose from.

On top of that, they have a “PC Konfigurator” that actually works!  And when I say works, I mean that bugger WORKS.  Most companies I’ve gone to with intent to use their config tools have very limited selection of materials inside their tools, forcing me to either take a pre-configured option and just buy parts separately for aftermarket add-on, or to simply skip them entirely.  Mifcom’s configuration tool not only has a wide array of options (for example, at the time of this writing they have 56 different cases and 54 different graphic cards – not counting SLI or Crossfire combinations), but it is smart – it knows which options go with which and will generally prevent you from buying parts that don’t work together.

To top it off, if you start with one of their pre-configured systems, you can then input that system directly into the configuration tool and add/remove/modify the stock system to create your own custom tweaked box.  VERY impressive.  They offer watercooling setups to fit your custom design.  Overclocking settings to match.  Extra fans for the case.

What’s more, there’s also what they offer to not sell you – any item (with the exception of the case and main board) can be removed, so if you’re seeking a specific brand of part, you can source that elsewhere and add it when the system arrives.  For example, I bought my system sans operating system – I chose to buy mine separately and install that myself (I’ll post a writeup on that little adventure separately).

Once you make your configuration to your desire, you may save it (if you register yourself with Mifcom) or just have that configuration e-mailed to you.

Payment Options – 9

Mifcom accepts a wide array of payment options, making purchasing a simple matter.  In addition to Credit Card and direct bank transfer, they also provide financing options through Commerzbank (a major bank in Germany), cash-on-delivery (max. permitted is 2,500 Euro), cash-on-pickup (if you live close to Munich, you can visit their facility and pick up directly), and very interestingly, they accept PayPal.

I would have given them a score of ten here, but had to deduct a point because the Credit Card method carries a 1.9% surcharge, and because free shipping is offered to only Bank Transfer purchases (it is 9.90 Euro for the rest, which just struck me as a small annoyance).

System Warranty – 10

Mifcom extends a standard three-year pick-up and return warranty to all their systems (longer warranties may be available for additional cost).  This includes all custom configured systems and even their Overclocked systems.  Even for the systems which include SSDs, which have a reputation (which is really no longer deserved) for being short of lifespan.  Very little to say here, it’s simple, effective, and no questions asked.  Very unexpected for a computer firm to have simple terms and few caveats.

A third-party provider (“Trusted Shops”) is also made available at the checkout in case one wants to add extra coverage to one’s purchase.

Online Support – 8

Publicly-available forums are available, which gives the user an opportunity to look up any problems (s)he may be experiencing and determine if a solution has been found previously.  An online support request may also be filed if one wishes to make a return, and drivers are available for any and all parts that Mifcom makes available.

I docked a couple points on this simply because telephone options are not readily found – almost all the options are made via the internet, which means that if your system is suffering trouble that prevents you from getting online, you won’t be able to connect with support options.  If you do purchase from them, it would be best to retain a phone option and store it with the system documentation in case of emergency.

Assembly Time – 8

I bought a customized model, so I wasn’t expecting the system to ship overnight – Mifcom offers 5-9 business day turnaround from the date they confirm payment, and they send out email notifications when the system is built and being shipped.  Mine was about six days, which means to me they probably had everything in stock and did the plugging in and a bit of burn-in to test it.  I can’t speak to the pre-determined configs (though I’d bet on the higher-tier models there is a longer turnaround time, since few shops would keep such systems handy).

They promised 5-9, they delivered in 6.  Very good.  Managing customer expectations is a good thing.

Shipping – 8

Shipping is generally done by DPD, a standard delivery system in Germany.  They can reach most locations in Germany within a day or so, perhaps two.  Basic, but sufficient to accomplish the job.  Mifcom supplies a tracking number as soon as the system is handed over to DPD, and DPD is very good at keeping its tracker up to date with changes in status.

One inconvenience I found was that the system was sent as two boxes which I didn’t know about, and the tracking number provides feedback on only the primary – so when the two showed up on different days, I was slightly anxious that there might have been a mistake.  (Happily, there was no issue.)

Packing was fantastic.  Plenty of padding, double-boxed in the box that the case came in surrounded by lots of shock-absorbing insulation.  It probably could have been dropped from six or seven feet without damage.  Even the interior has an expanding-foam restraining pad to keep the internal parts securely in place.

Build Quality – 8

All the parts were cleanly and securely mounted, and even though I didn’t purchase any special cable management, the interior was very well-organized.  The reason this score isn’t a 10 is that the factory overclocking I wanted didn’t take – my main board bios reported an overclocking failure and reverted to default settings.  I’ve had to go into it and re-tool the overclocking settings myself, which I’m not quite done with.  If I were an OC expert, I probably wouldn’t have paid for the service, but it’s been over three years since I dorked around with memory timings or CPU ratios, and I was hoping I’d get a good setting that would stick without me having to jerk around with it.

Summary Score – 9

In short, I would without a doubt recommend Mifcom to anyone looking to buy a new PC.  The cost is reasonable, the systems available can cover practically every need – and those that cannot be supplied by Mifcom can generally be left empty so you can handle the add as an aftermarket without being left with a cheap default piece of kit.

So if you’re looking for a new PC, I don’t think you can go wrong with Mifcom.  They’ll get you the PC you want in a very reasonable time – and they’ll support their build without qualms.

Here’s the site, if you’d like to browse it directly:  www.mifcom.de

Happy computing!

UPDATE:  Here’s the instructions on how to setup a Windows UEFI installer for a box as up-to-date as this one was.

UPDATE 2:  I’ve been asked a few times what my system layout was, so here it is…

Case: Cooler Master – CM Storm Stryker with window
Silent Case Fans: 2x Noiseblocker Black Silent Fan

Motherboard: ASUS Rampage Extreme V, Intel X99 (this one had onboard WLAN, regular LAN, OC’ing features, great audio, still has room for more RAM, and can support up to four GTX cards in SLI mode, though at present is set up with only one)
CPU: Intel Core i7-5820K, 6x 3.30GHz (I’m OC’ing this to 4.2, might try 4.5)
CPU Coolers: Noctua NH-D14
RAM: 32GB DDR4-2400 performance (4x 8GB)

Graphics Card: Palit GTX 980 4GB “Super Jetstream” model

Drives:
Boot: 2 Crucial MX100 512GB SSD drives, RAID 0 (striped)
Storage:  2 WD Caviar Green 3TB drives, RAID 1 (mirrored)
Optical: LG BH16NS40 Blu-Ray burner

Card Reader: Internal Card Reader 54 in 1 USB-out, 3.5″

Windows 7 Ultimate (normally would go with Pro, but since I live over here, it’s hard to get English Pro versions, and Ultimate you can download every language pack on the planet included).

Posted in PC Hardware, Uncategorized | Leave a comment

The End of…Ice?

This is a follow-up to my CO2 primer posted a while back.  I wanted to add a sense of scale to the nature of the problem here, so people might get a feeling for the level of “critical mass” we must deal with.

Annually, the combined ice loss of the Arctic, Antarctic, Greenland, and glacial sources equates to approximately 700 billion tons of ice. 700 billion tons every year.  (IPCC figures)

That right there is an enormous amount of energy – let’s look at it from a high-school chemistry standpoint:

I’ll simplify it a bit, as we go – let’s assume all that ice is already at zero degrees C when it melts, and it melts into 0 degrees C water (it doesn’t, really, it is colder and works its way to zero, then melts and keeps warming). So we’re *only* going to look at the energy required to melt that ice.  To melt ice is to have it move from one state (solid, ice) to another (liquid, water).  When it’s solid, it has bonds between all the molecules that need to be broken and reformed into a different set of bonds, and it takes an input of energy to do that.

It takes 80 calories to melt one gram of ice. 700 billion tons of ice is 700 million billion grams of ice (1 ton = 1,000 kg, 1kg = 1,000 g, therefore 1 ton = 1,000 * 1,000 g = 1,000,000 grams).

So for each ton, that’s 80 million calories of energy. To melt 7 tons takes 560 million calories. 700 tons would be 56,000 million calories. 700 billion tons is 56,000 million billion calories. That’s beyond normal comprehension, so let’s turn that into something we might recognize.

The USDA recommended daily food balance comes in at about 2,000 “calories” (these are dietary calories, equal to 1,000 calories in the chemistry sense) per person per day. For the entire country of 300 million people, that makes 600 billion calories of food per day. Let’s assume we’re overeager eaters, and we end up eating 700 billion calories because we go to Wendy’s too often.  Turning that into “chemistry” calories means 700 thousand billion.  Now we’re starting to see numbers we recognize…

One year’s melt requires 56,000 million billion calories. Let’s bring that down to one day’s melt: divide 56,000 by 365 and we get 153 (I’ll drop the fraction). So every day the ice consumes 153 million billion calories.

We’re going to try to turn that number into “number of food-days for the USA”, so to get that we’re going to end up dividing one with the other – ice calories divided by food calories. So first, drop the billion on each side.

Now we’re down to 700,000 on one side and 153 million on the other. Let’s divide. I get 218 from that (again, dropping fractions). This indicates that the amount of ice melting into water, EVERY DAY, absorbs the energy equivalent of the USA’s dietary requirements 218 times.

The United States could eat a full day’s worth of food for twenty-nine weeks (a little more than seven months, start January 1 and go all the way through your July 4th cookout), and still not quite reach the total energy consumption required to melt the amount of ice the planet is losing on average every day.

Now here’s the kicker that I hope will give you some reason to start asking “what can I do?”:

Where is all that energy going to go when the ice runs out?

Posted in Climate Change, Politics, Science | Tagged , , | 1 Comment

CO2 – A Primer On Its Effects In The Atmosphere

This post is written to describe the basic effects of greenhouse gases, and CO2 in particular, for those who are unfamiliar with how the greenhouse mechanism works.  Apologies to any physicists who might be reading this, I’m going for a very gross generalization here, not a paper for Nature.

For starters, let’s define the “greenhouse effect”.  In this context, it is:

The ability for something to allow energy into a system, but also to prevent or retard its exit. 

This sounds paradoxical, doesn’t it?  How can something let energy in freely, but then prevent it from getting out?  I’ll give you an example that probably everyone reading this will have encountered.

It’s the middle of summer and you walk out into a parking lot to get into your car – and inside the car it is insanely hot.  So hot that it could kill you if you had to stay in there.  Yet out in the parking lot, it might be uncomfortably warm, but not lethally so.

What has happened here is that the inside of your car is subject to a greenhouse effect as a result of the nature of the glass in the windows.  Visible and other wavelengths of light can pass through the glass – they enter the car freely through the windows (which is why you can see through them), and some are absorbed by the interior of the car.  Some bounce back out, giving us a view of the interior.

(Image from Wikipedia)

Light, of all sorts, is made of photons.  Different photons have different wavelengths, and those wavelengths represent how much energy is contained in that photon.  Wavelength changes inversely to energy, so a short-wavelength photon will be higher energy than a long-wavelength one.  X-Rays – very high energy, very short wavelength.  Radio – very low energy, very long wavelength.  Imagine it this way: if the photon is crammed up into a really small wavelength, it’s going to be very compact and energetic.  If it’s stretched out a great deal, it’ll be slow and lethargic.  Wavelengths also govern how photons interact with things – if a thing (like an atom in your steering wheel) is a size that matches the wavelength of the photon, that thing can absorb the photon.  If it isn’t the right size, the photon passes it by.  So visible light photons pass through glass windows because the glass molecules aren’t the right size to stop them – but the metal and plastic molecules of the car body are the right size, and absorb or bounce them back.

Back to your car:  it’s the photons that get absorbed that we need to understand – they end up in the materials inside the car: the seats, the steering wheel, the dashboard, etc.  They impart energy into these materials, and then those materials get “energized.”  That’s not a technical term or anything, they just have absorbed the energy of the photon – the photon is gone, and the atom or molecule is now a little bit jazzed up. After a period of time, the atom or molecule of steering wheel calms down again, by emitting the extra energy it built up when it absorbed the photon.  It does this by emitting photons itself – in this case, on the infrared wavelength, which while we can’t see it, we sense infrared as heat.

“Hot” in our body’s language means we are absorbing infrared photons – the warmth of your coffee cup, the heat from a fire, all that is infrared.

Now here’s the catch:  glass molecules are the right size to catch infrared.  So while your car is sitting in the parking lot, all kinds of visible and other light is getting in through the windows, some bounces back out, but the majority of it gets absorbed inside the car, and then re-released as infrared.  That infrared can’t get out directly because the glass won’t let it pass – so more and more builds up inside, and the interior of the car gets hotter and hotter.

So how does this relate to carbon dioxide in the atmosphere?

CO2 in the atmosphere operates similarly to the glass in your car…ultraviolet, X-Rays, radio, and visible light all pass through it without issue.  Infrared gets blocked, however – much like the glass of your car, CO2 is the right size to catch infrared.  It’s this one property that makes things interesting in this context.

CO2, along with other gases, acts in a similar way to a blanket – it keeps heat in the atmosphere.  It does this similarly to how the glass in your car keeps heat in your car.  What happens is that light passes down to earth from space, is absorbed when it comes down here, and is re-emitted as infrared.  For example, sunlight comes down, sinks into the pavement of your parking lot, and makes it hot (it is emitting infrared).  If there was no atmosphere, the infrared would radiate away into space freely.  However, we do have an atmosphere – and the infrared has to pass through this.  CO2 is part of that atmosphere, and catches some of that infrared, gets excited, and then emits infrared again when it calms down.  Those emissions from the CO2 molecule will be sent out randomly, half towards space and half back towards the earth.  This results in the “blanket” of CO2 keeping some heat in the atmosphere.  When you add more CO2, there’s more to catch infrared, and a heavier blanket effect.

In the 1800s, CO2 existed in the atmosphere to the tune of about 280ppm (parts per million – for every million molecules of anything in the air, 280 of those were CO2).  That amount came from mostly natural sources – biological respiration, volcanoes, forest fires, etc.  Over the last half-million years, that concentration has fluctuated between 180 to 300 ppm, and those fluctuations take place over thousands and thousands of years.  As with any concentration of anything, there are ways things enter the system, and things exit it.  The system being earth’s atmosphere, and the something being CO2.  Respiration by living things being mostly responsible, volcanoes being a dramatic example (their amount of CO2 entering the system is measured to be about 300 million tons per year).  Plants remove CO2 from the air, and CO2 also dissolves into the oceans, where plants and animals can take it up and eventually turn it into sodium bicarbonate (a common ingredient in sea shells), and other body parts of plants and animals – which, when they die, fall to the floor of the oceans and are eventually subducted through tectonic shifts.

Nature as we experience it today evolved to deal with a pretty steady amount of CO2 in the atmosphere, and had millions of years to adapt to changes.  There’s a lot of input and output – see that chart I put up there, which was current in 2007.  As you can see, the total ins and outs are pretty big – about 750 billion tons or so in, and in 2007, about 735 billion came out.  That produced a net gain of 15 billion tons per year.  Some of that gain got absorbed by the oceans, but the lion’s share went into the atmosphere.

Over the last 10,000 years or so, we’ve had a fairly steady concentration of CO2 – the blanket has stayed about the same.  In 1880, the concentration was as I mentioned above, 280ppm.  In 2007, it reached 375ppm.

Just a few months ago in 2013, that concentration reached 400ppm.

That means the blanket of CO2 in the atmosphere is 43% heavier than it was a little more than a century ago.


(Image from the New Scientist)

So where did all that extra CO2 come from?  Well, to put it simply, it came from us.  The industrial revolution is marked most distinctly by the fact that we discovered vast stores of volatile chemicals in the earth – hydrocarbons.  These became the fuels we know today:  gasoline, coal, diesel, jet fuel, etc. We found that these burn very handily, and if we harness the power of burning them, we could drive machines, keep ourselves warm, and so on.

So we burned them.  We still do.  Do you drive a car?  You probably burn them now.  The Volkswagen Golf 1.6 liter TDI, for example, burns fuel for every km you drive.  It’s one of the most efficient vehicles there is.  And it still releases 99 grams of carbon for every kilometer you drive.  (That’s 5.6 ounces per mile, for my American and British folks.)  I would take a guess that most readers are driving vehicles that pump out a lot more.  Now multiply that weight times the number of miles you drive to work or school.  Then x2 because you have to drive home.  Now x5 for a work-week.  Now x50 for weeks in a year (I’m assuming you take two weeks holiday).

If you drive the TDI above on my commute (9.5km), that means you would be pumping 470.25 kilograms of carbon into the air every year.  And that only takes into consideration the driving habits.  It does not reflect how much gets burned to keep your lights on, to keep your house heated in the winter and cooled in the summer, how much is used to pump the water that flushes your toilet or runs through your shower.  There are hundreds of millions of cars in the United States alone.

Remember how I pointed out that volcanoes, the primary source of carbon dioxide in the atmosphere, that they put out about 300 million tons of CO2 every year?  And how this is a naturally balanced value, where geological and biological systems generally absorb this stuff to keep the atmosphere relatively stable?

Humans were not a big contributor to CO2 levels in the 1800s.  However, since the beginning of the 1900s, humans have increased their burning of carbon fuels and have exceeded volcanism.  By a lot.

We pushed out 31.6 billion tons of CO2 last year (2012).  That’s about one hundred times the amount of all the volcanoes on the planet combined.  We humans are a force of change exceeding geological scale.

In addition to the greenhouse effect that CO2 is having on the atmosphere, the CO2 is also being absorbed into the oceans – and this is having a very serious effect through acidification of the waters.  I may post something about that as well.  But for now, this post is just on greenhouse effects…something for you to consider.  These things I’ve posted up here aren’t opinions.  They’re observations.  So when you see someone arguing about whether humans are causing climate change, point them to this stuff above – these are facts, not subject to debate or opinion.  And sadly, they lead inexorably to the conclusion:

We are causing this.  The only option to avoid the overheating of our one and only home, is for us to change how we behave. 

Think about it, every time you climb into the car, every time you use energy.  Every time you vote in an election.

Update: to try to add a little scale to the effects this has, I put together a post about annual ice loss and how it equates to the amount of energy our globe absorbs.

Update 2:  corrected biggest source of CO2

Update 3 16.10.2018 – fixed broken link on New Scientist graphic


Posted in Uncategorized | 1 Comment

Homebrewing – a primer on how to start, and a mead recipe for you

Here’s the scoop on making your own medovina:

Company to buy stuff from: williamsbrewing.com (you probably have some local vendors in the Chicago area, Brewcamp is one I would recommend – they even have basic classes you can attend. (brewcamp.com)

Stuff you’ll need – and some good news: most of this crap can be had in a starter kit, probably will set you back $120-$250 depending on what all you get with it. Also a note: you’re going to be muscling around a fermenter and 5-6 gallons of contents from time to time, so if you have a bad back, consider that.

Mandatory stuff:

– A big kettle, the bigger the better. I’d recommend at least 30 quarts, 40 if you can find it.

– A fermenter (this is where your brew will go after you heat it, and where the yeast will do its work). Normally kits will sell you a plastic bucket-style fermenter, but I really recommend you go with glass or PET plastic. I prefer a 6 or 6.5 glass carboy myself.
* Alternative: if you have trouble with a large fermenter like those, you can get small, 1-gallon jugs and put stoppers/airlocks in them too. From a weight perspective it’s much more manageable, but from a work perspective you’re going to be dealing with 5-6 of these all fermenting at the same time – it’s a bit more work.

– An airlock (and a stopper for the fermenter if it’s glass or PET)

– A long paddle or spoon (20″ or more)

– A bottling bucket (big food-grade plastic bucket, 6 gallon size or so, has a spigot in the bottom)

– a food-grade plastic funnel

– A siphon and tubing

– bottles and caps (I’d recommend getting the larger 22 oz bottles, 12 oz are just too many). If you can find swing-top bottles with a ceramic plug and rubber gaskets, those are even better, but can be a little more expensive
* bottles are something I just collect from beer and wine I drink – accumulate enough for a few batches and you generally won’t have to buy fresh

– A capper if you’re going with capped bottles

– A bottle brush (for cleaning out bottles, shockingly enough)

– A hydrometer

– cleaning solution (Saniclean I think it’s called over there).

– ingredients for your first batch

– A book on home brewing. There’s only one I can recommend here for a starter: Charlie Papazian’s “Complete Joy of Home Brewing”. This is the only one to get.

– A few bottles of your favorite beer or some wine you enjoy

– A safe place for your fermenter to sit long-term that doesn’t get too hot or cold, and is not subject to sunlight. 70 degrees F or so is perfect. Make sure it isn’t carpeted – accidents will happen and they will make a sticky mess from time to time.

Optional:

A bottle tree – used for drying bottles, holds them mouth-down so dust doesn’t settle in them while drying, and also has a fountain-tub on top that you can fill with cleaning solution and set up a really fast spritz-spritz and then hang the bottle on the tree. Before getting one of these I would empty out my dishwasher, open it and set my bottles mouth-down on the racks there. Although I mark this as optional, it’s probably the first thing I’d recommend you get. I hate spending a lot of time with bottles ).

A wort chiller (big copper coil with hoses that attaches to your sink, can be very handy, but you’ll be fine without it for your first few batches)

“Jet Bottle Washer” – usually brass, sometimes plastic, this is a unit that attaches to your sink and shoots a high-pressure blast of water into a bottle. VEEERRRRYYY useful for cleaning fermenters


As a first move, I’d recommend you get a simple beer kit for a brown ale or a porter and roll out a batch of beer. That’s only going to ferment for a week or two, and then two weeks in the bottle to carbonate, and it’s ready to drink. Williams has an English Porter kit, with all the ingredients you need. Good for starting out.

Beer is actually somewhat more complicated to make than medovina, so you’ll find doing meads very easy once you’ve done a beer or two. Here’s a recipe for one I make that is a champagne-style (dry and sparkling):


Ingredients to make 6 gallons (adjust down on water and honey if you’re making less):

7kg + .5kg honey – preferably sourced from something specific that you like the smell of, but regular supermarket honey will do if you have to

4 cl isinglass (this is a fining agent available at all brewshops)

6 tablespoons acid blend (used in wine a lot, also available at all brewshops)

1 tablespoon polyclar (fining agent, available at all brewshops)

3 tablespoons yeast nutrient (also available at all brewshops)

1 packets Red Star Pasteur champagne yeast (buy 2, they’re cheap, and in case one doesn’t work you’ll have a spare)

____

You’re now going to prepare the big sugary playground for your yeast:

Crack open your beer or wine and have a drink.

Sanitize your fermenter and equipment

Set aside one half-kilo of honey, you’ll use that after the ferment is done.

Boil 4 quarts of water in your kettle

Reduce the heat

Add the 7kg honey (remember to leave the extra half-kilo aside), stirring to dissolve it in (rinse the containers with hot water into the kettle so you don’t lose very much)

Return heat, add acid blend, irish moss, yeast nutrient, and isinglass

Bring it to a boil (you’re only bringing it to a boil, you’re not boiling for any length of time – you lose the aroma of the honey if you boil it for more than a few minutes), then turn off heat and cover it.

Let the kettle cool until it’s easy to touch (warm is okay, hot is not)

***
You’re waking the yeast up here:

Take an empty tumbler (the kind you’d drink whiskey from) and half-fill with clean water.
Put the yeast from the packet into the water and let it dissolve into the water, stir a little with a spoon to smooth it out and get rid of lumps.

Set this aside.

***

Using the funnel, pour your warm mix into the fermenter slowly and carefully (splashes will get sticky).

Add cold water top-up to 6 gallons. (You want to make sure there is some breathing room between the top of the water and the top of the fermenter, it’s going to get foamy in there.)

Note:  be really careful about how hot the mix is that goes into your fermenter.  If it’s too hot, you’ll have to wait until it cools significantly before topping it up.  Hot + cold in a glass fermenter = shattered glass and a major, major mess in the kitchen.  Warm + cold = safe.

***

Take your glass of yeast and add it into the fermenter.  This is termed “pitching.”

Add the polyclar here as well. Nominally this isn’t really a necessary ingredient for mead, but I like to use it just as a habit.

Agitate the water (my fermenter is tear-drop shaped, so I can just roll it around a little to get the water stirring up well, a plastic bucket will need you to use your paddle/spoon). You want to aerate the water this way, so don’t be afraid to get it rowdy.

Cap off the fermenter and plug in your airlock (airlock shouldn’t have too much water, but definitely enough that it’s going to only allow air *out*)

***

Set the fermenter in its resting place. Check on it every couple hours before bed – you’re looking for tiny batches of foam to start building up on the surface. That indicates your yeast is getting traction, it’s a good sign. Check it again in the morning, it’ll probably surprise you with a big steady stream of bubbling.

It’ll ferment for at least a week, probably two or more. I’ve had meads run for six months in the past, but this one should go pretty easy.

***

Once the ferment is done (the bubbling will have stopped for at least three or five days – this isn’t time sensitive, you can let it sit for a while), keep an eye on it to see when it clears. Once it’s completely clear, it’s ready for bottling.

Have another beer or some wine while you do this ).

Day 1: Sanitize your bottles and bottling-bucket and hang them mouth-down to dry.
Day 2:

If you have bottles that take caps, boil a quart of water and immerse your caps in it to sanitize them.

Boil one quart of cold water and the half-kilo of honey you set aside earlier

Make sure your bucket’s siphon is closed

Siphon the content of the fermenter into your bottling bucket – try to minimize the amount of the “mud” from the bottom of the fermenter into the bucket. That stuff is called “lees”, btw.

Siphon some of the clear into a small glass. Sip and enjoy while you bottle the rest.

Once you’re done siphoning, add the boiled water with honey to the mix.

Take about half a cup of the lees / mud from the bottom of the fermenter and add it into the mix, stir it all up to make sure it’s evenly distributed.

Fill the bottles from the bottling bucket. To fill, bring them all the way up because when you pull the bottling tube out of the bottle, it’ll create a little air space in the neck of the bottle, that’s perfect.

If they’re swing-tops with rubber gaskets, seal them as soon as you have filled them. If they’re capped bottles, set a cap on them and set them aside. Once you’ve filled as many bottles as you can with the contents, cap them all.

Let the bottles sit in a cool dark place for four weeks. The mead is carbonating during this time. You can put one in the fridge and pop the top on it every week or so to check it – just drink it and be happy ).

Each bottle will get a tiny bit of lees in the bottom – try not to pour this into the glass. It’s not bad or anything, but it will make the taste of the mead off a little.

***

Chill and serve in champagne glasses.

Enjoy!


Posted in Biology, Cooking | Leave a comment